K8S Cluster
On this page, you can find an explanation of how to create, resize, delete Kubernetes Cluster and instructions for other steps to manage Kubernetes Cluster and its Node Pools in the Cloud Console.
Table of contents
- Table of contents
Clusters page
To get to the Clusters page, select the Clusters from the VIRTUAL DATACENTER block in the side-bar menu:

On this page you can find all created Kubernetes Clusters in the current Project of the selected Organization, with the Create button, Search bar and Actions icon which opens a list of available management actions for the selected Cluster:
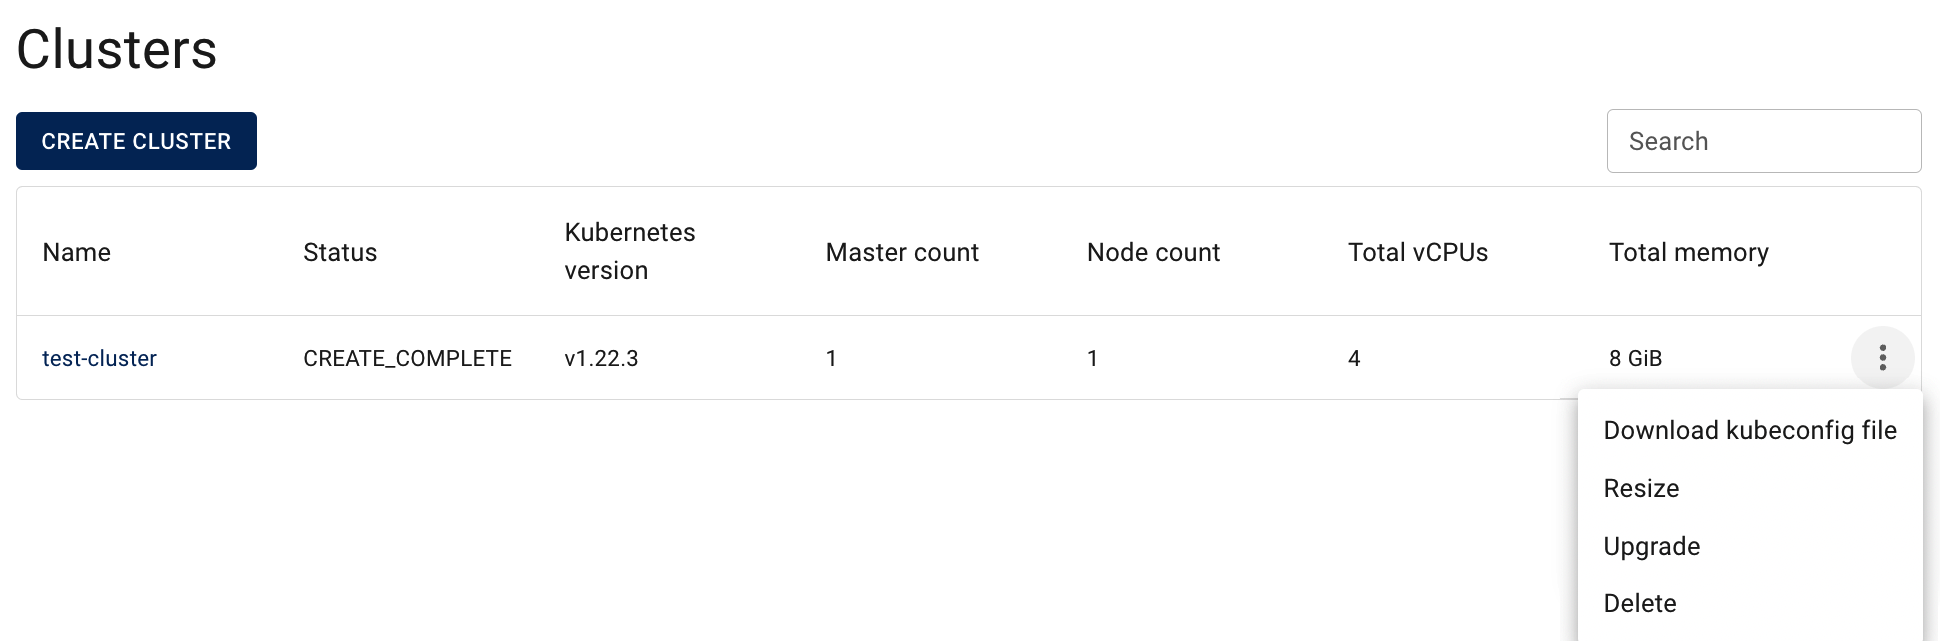
Actions icon opens the next list of available management actions:
- Download kubeconfig file - this option is used to get the kubeconfig file, that pertains to the selected Cluster;
- Delete - this option is for Cluster removing.
Create Cluster
To create new Cluster, do the following:
- go to the Clusters page and click on the CREATE CLUSTER icon in the upper left corner;
- fill in the form on the next opened Create Cluster window and click on the CREATE icon:
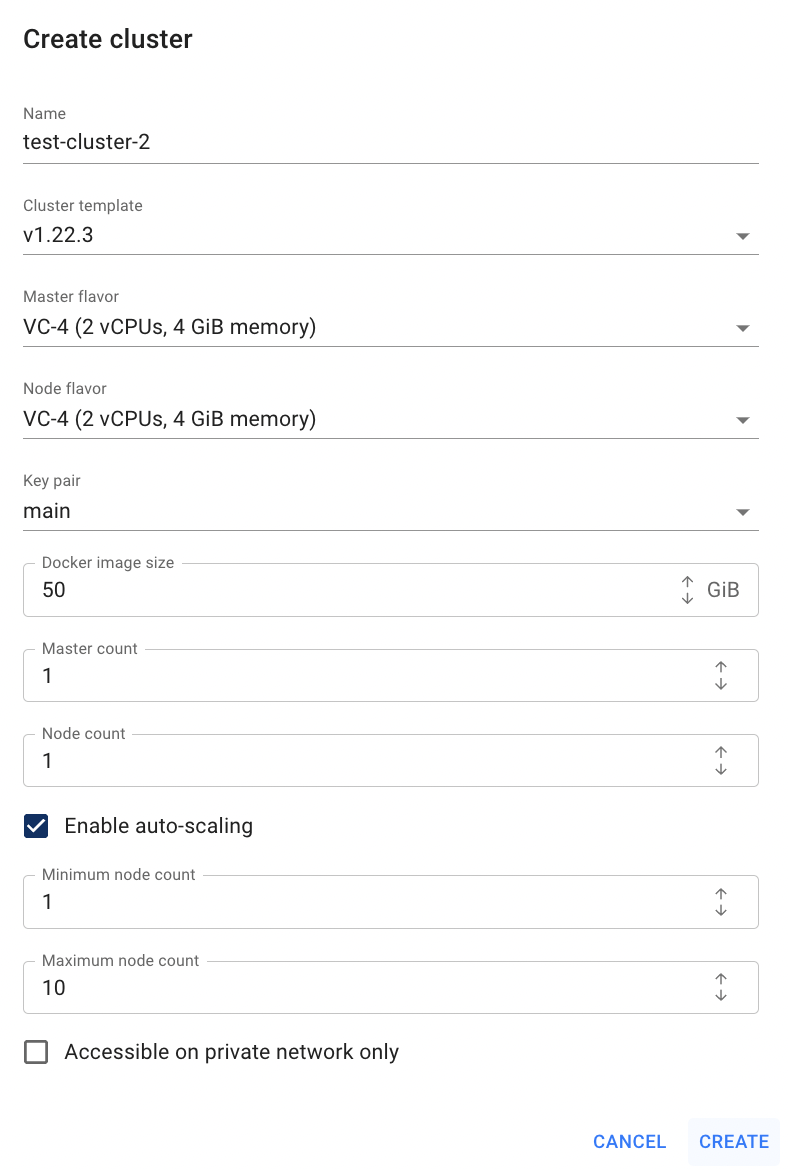
- Name - set a name for the Cluster;
- Cluster Template - select the template that will be used to create Cluster;
- Master Flavor - select the size of the Cluster master-nodes (min is VC-2);
Available flavors for nodes (master or worker):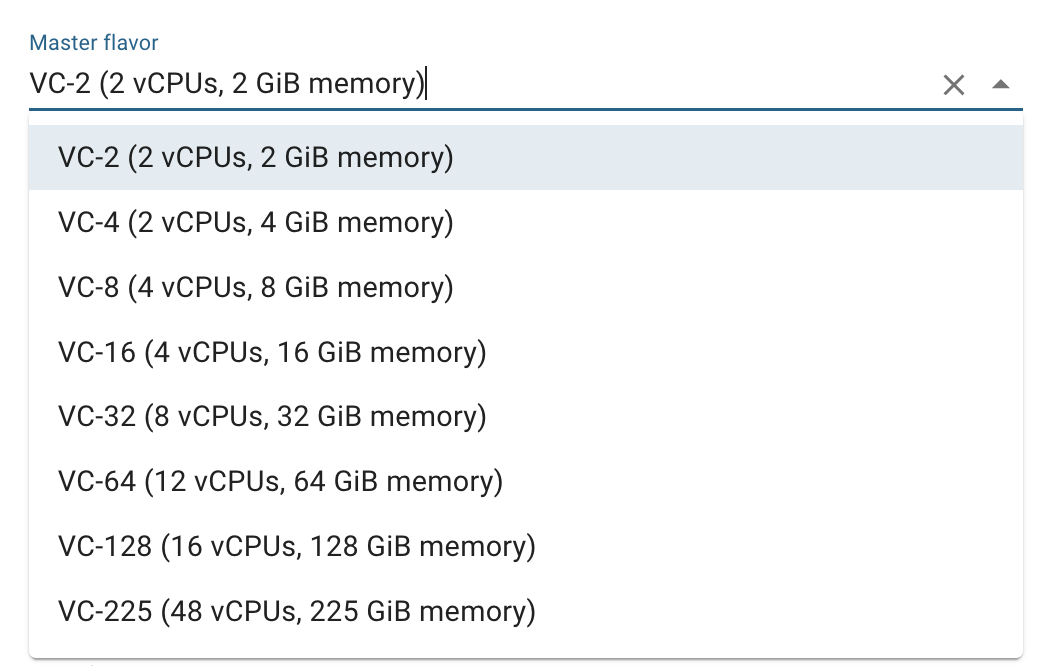 💡 If you need a custom flavor, you can request it via support.
 - Node Flavor - select the size of the Cluster worker-nodes (min is VC-2);
- Key pair - select the SSH Keypair that was previously created on the Keypair page or create a new one;
💡 SSH Keypair you will use to configure in the Cluster servers for ssh access; - Docker image size (GB) - provide the preferred disc size where container images will be stored;
💡 the range - from 50 GB to 1000 GB; - Master Count - set how many master-nodes the Cluster will contain;
💡 for production environments, use at least 3 master-nodes; - Node Count - set how many worker-nodes the Cluster will contain;
- Enable auto-scaling - if you choose to enable this option, please set the limits of node count;
💡 the max count is 10 nodes; - Accessible on private network only;
- Features - switch on the optional cluster features you want to enable for the new Cluster (see Cluster Features for the full list of available features and storage options).
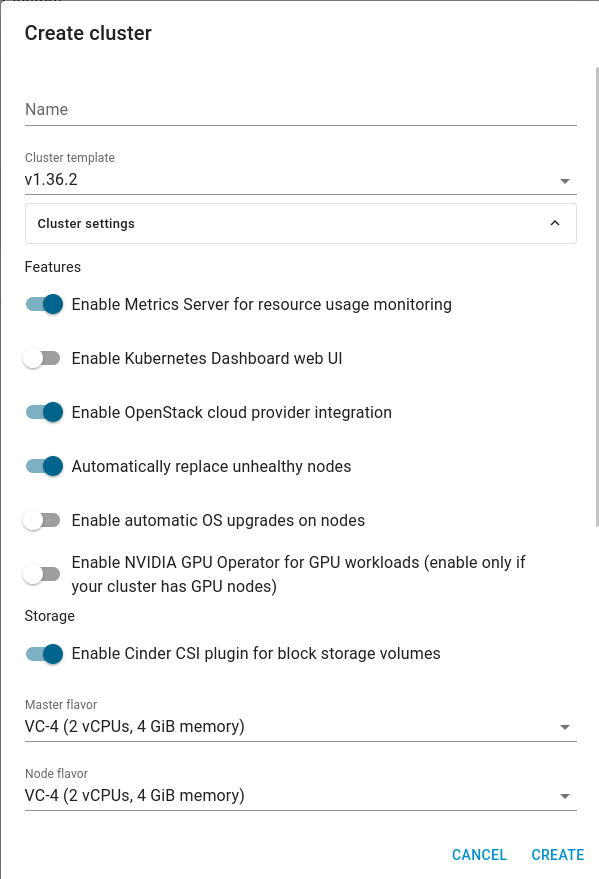
💡 All features enabled during creation can be changed later from the Cluster details page. See Cluster Features.
After these steps, the newly created Cluster will be added to the Clusters page with the status CREATE_COMPLETE.
Estimate creation time about 5 minutes.
Cluster details page
To open the Cluster details page, click on the Name of the corresponding Cluster:
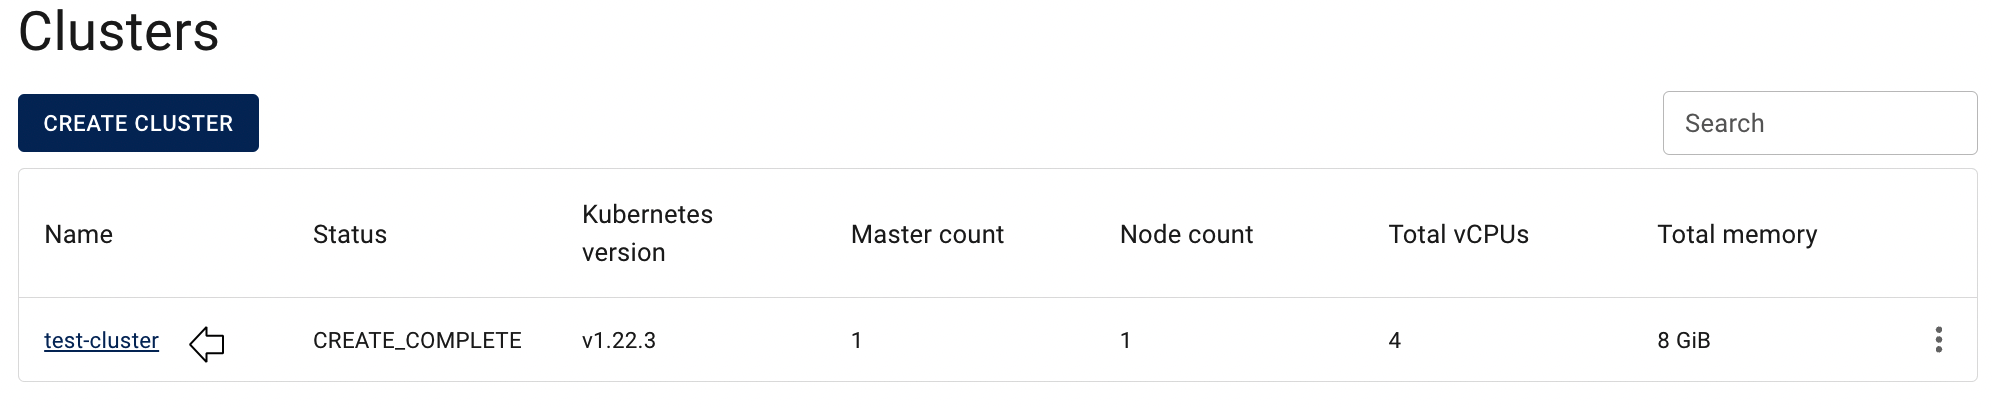
This action will redirect you to the Cluster details page, where you can find:
- Cluster details area with actual information about it - Status, Health, Kube Version, Created timestamp; Current Master Nodes count, Flavor and Connection section with API Address:

panel with available quick actions include management actions with this cluster such as: delete, download kubeconfig file and cluster upgrade:
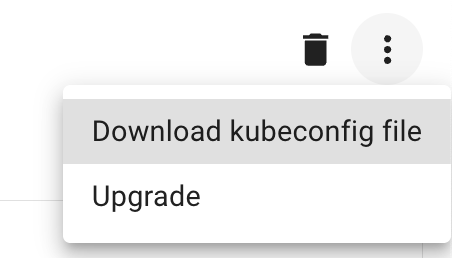
transition to the NODE POOLS, SETTINGS and LABELS pages related to this Cluster:

NODE POOLS TAB - opens the Cluster Node Pools page where you can find all available Node Pools of corresponding Cluster with their details; add, delete, resize, change the flavor, and configure autoscaling, node labels and taints for individual Node Pools.
💡 More information about the node pools management will be provided in the following sections.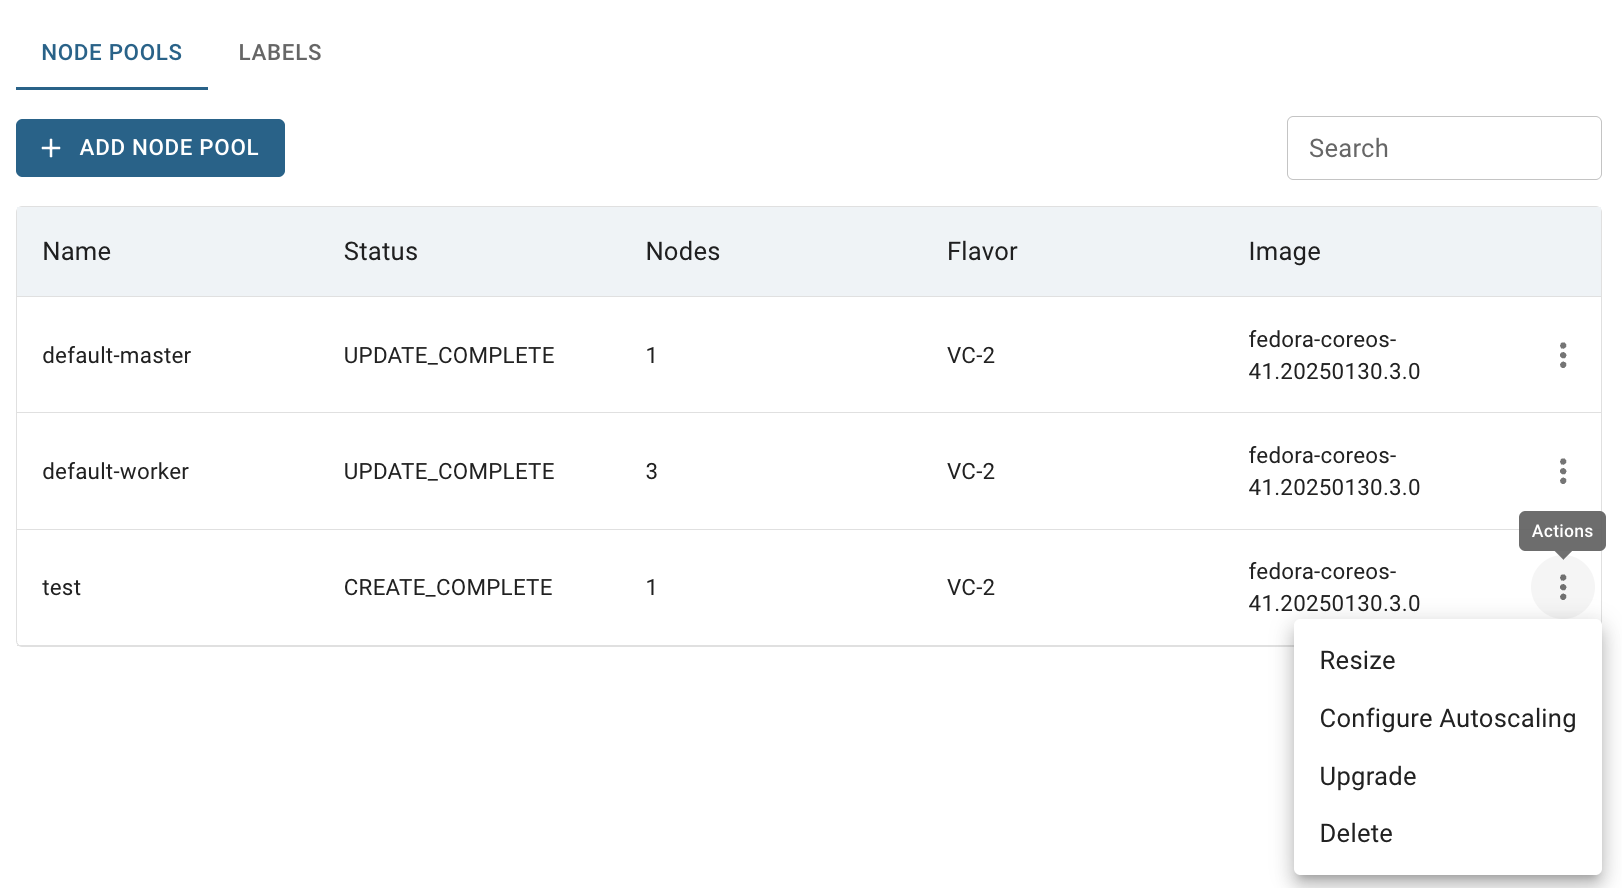
SETTINGS TAB - opens the Cluster Settings page where you can find all available optional clusters features that can be switched on or off to extend the cluster’s capabilities.
💡 More information about the cluster features will be provided in the following sections.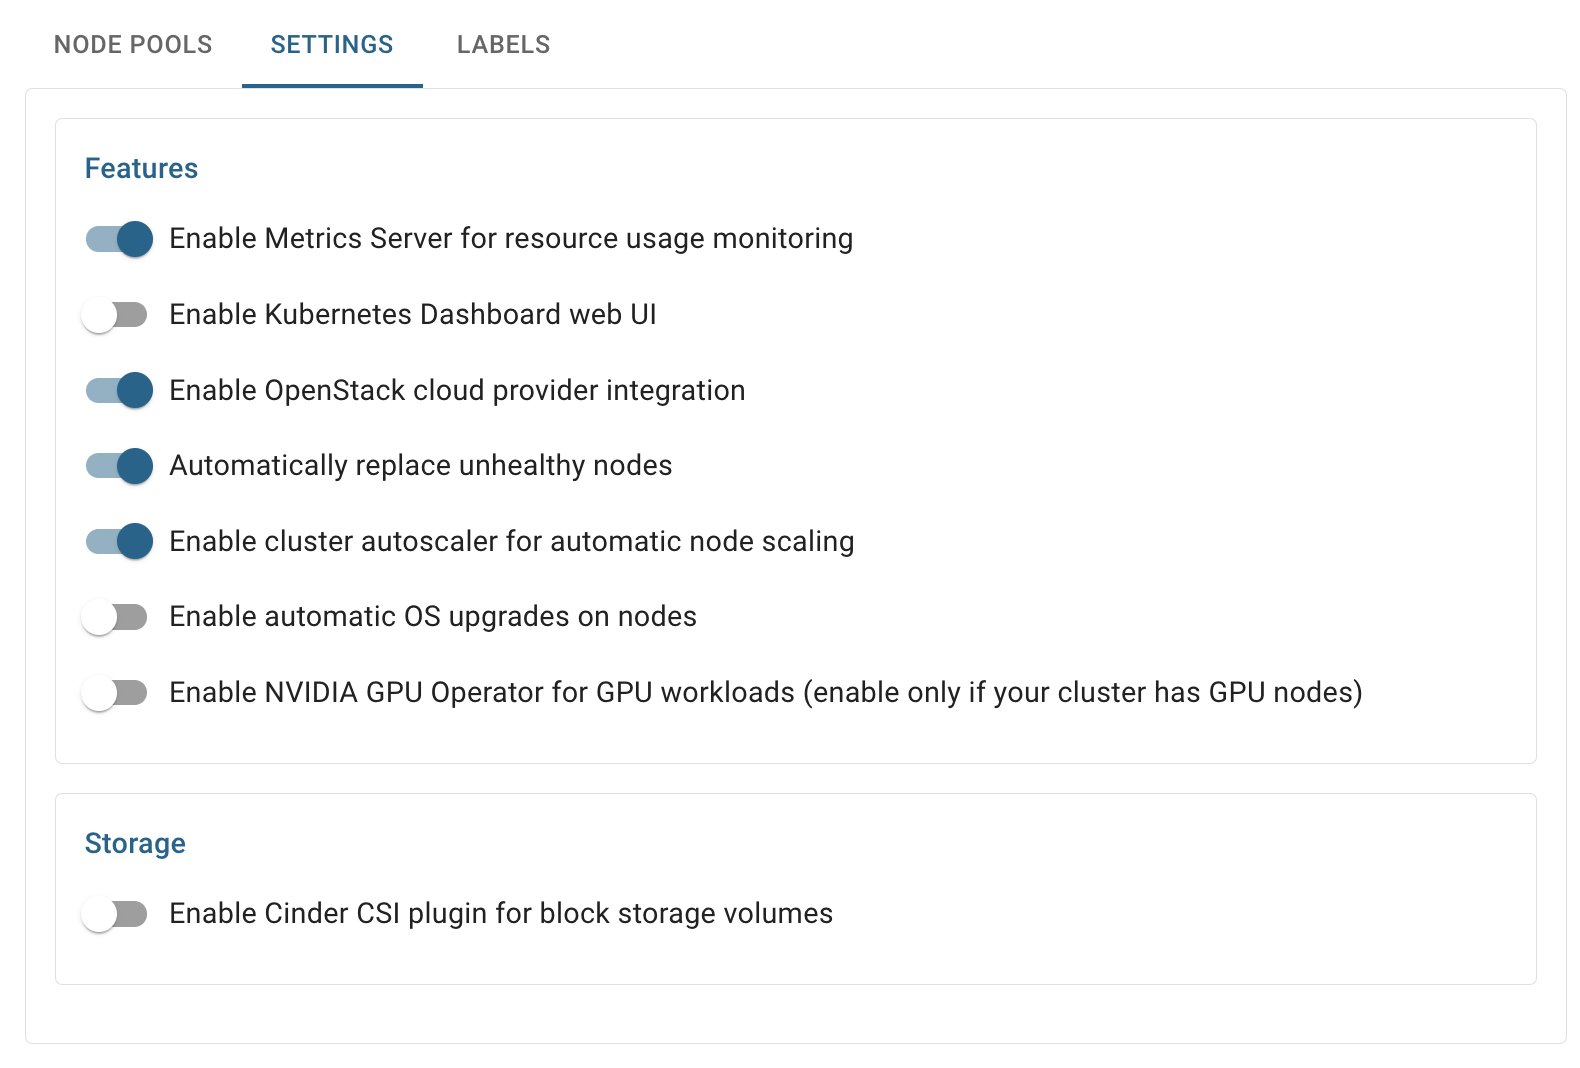
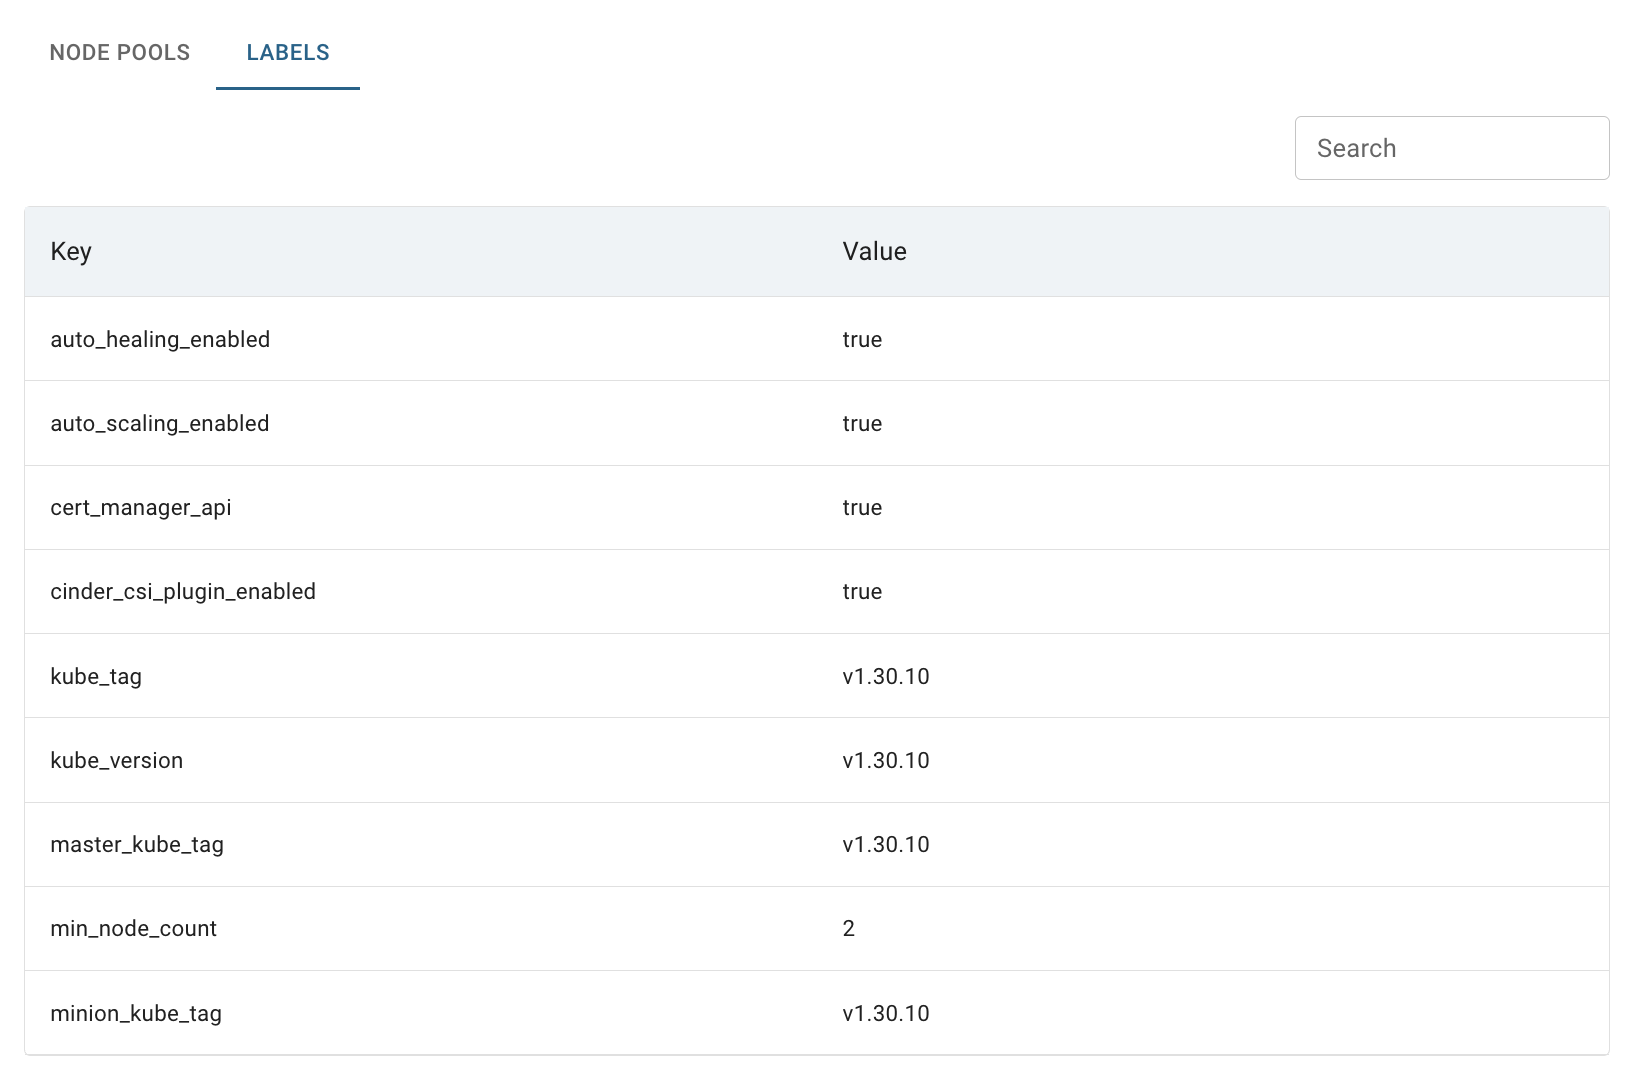
LABELS TAB - opens the Cluster Labels page with some additional information about this cluster:
Node Pools Management
The NODE POOLS tab displays all node pools within the selected Kubernetes cluster, showing their current status, node count, flavor specifications, and base images. Each node pool can be managed independently with different scaling and configuration options.
Node Pool Types and Scaling Behavior
Master Node Pool (default-master):
- Supports horizontal scaling up only (1→2→3 nodes)
- Cannot be scaled down once additional nodes are added
- Critical for cluster control plane high availability
- Flavor: Can be changed at any time using Actions > Change Flavor (see Change Node Pool Flavor)
- Upgrade: Requires whole cluster upgrade using Action Button > Upgrade
Worker Node Pool (default-worker):
- Supports bidirectional scaling (scale up and down)
- Configurable autoscaling can be enabled or disabled
- Handles application workload distribution
- Flavor: Can be changed at any time using Actions > Change Flavor (see Change Node Pool Flavor)
- Upgrade: Requires whole cluster upgrade using Action Button > Upgrade
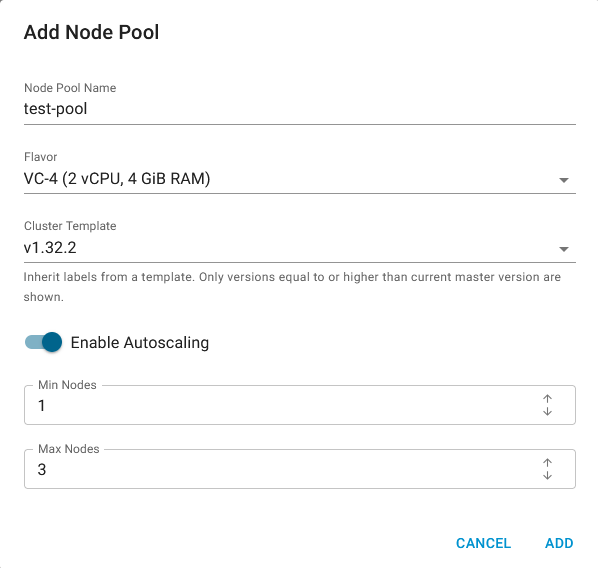
Create Node Pool
When creating new node pools using the ADD NODE POOL button, administrators can:
- Kubernetes Version: Deploy node pools with different Kubernetes versions than the cluster default
- Node Sizing: Configure specific node flavors and resource allocations
- Autoscaling Options:
- Enable autoscaling with minimum and maximum node limits
- Create fixed-size pools without autoscaling
- Custom Configuration: Define node labels and taints to dedicate the pool to a specific workload (see Node Labels and Taints)
- Independent Upgrades: Create and upgrade separate node pools to newer versions independently
Resize Node Pool
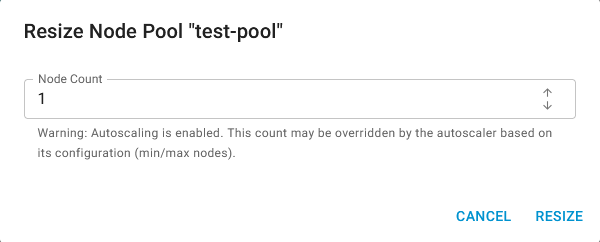
To resize the Node Pool, do the following:
- identify the Node Pool, that you want to resize, on the Cluster details page;
- click on the Actions icon and select the Resize in the list of available options;
- update the count of Worker-nodes in the Node Pool on the opened Resize Node Pool window and click on the SAVE icon:
Change Node Pool Flavor
The flavor of an existing Node Pool can be changed at any time, for both master and worker Node Pools. Use it when the current flavor no longer fits the workload - for example, when the control plane needs more memory or when worker nodes have to run heavier applications.
To change the flavor of the Node Pool, do the following:
- identify the Node Pool, that you want to change, on the Cluster details page;
- click on the Actions icon and select the Change Flavor in the list of available options;
- select the new flavor for the selected Node Pool on the opened Change Flavor window and click on the CHANGE FLAVOR icon:

📌 Nodes are replaced one at a time with the new flavor, so the workloads keep running during the change. For a master Node Pool, plan the change for a cluster with at least 3 master-nodes to keep the control plane available.
Configure Node Pool
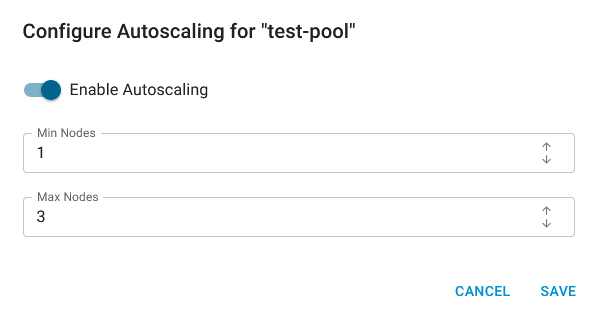
The Configure Node Pool window holds the autoscaling settings of the Node Pool together with its node labels and taints.
To configure the Node Pool, do the following:
- identify the Node Pool, that you want to configure, on the Cluster details page;
- click on the Actions icon and select the Configure in the list of available options;
- enable or disable the Autoscaling and change the minimum and maximum node count, add or remove node labels and taints, then click on the SAVE icon:
Node Labels and Taints
Node labels are key/value pairs that mark the nodes of a pool with a property - a hardware class, an owner team, or a workload type. A pod picks such nodes with a nodeSelector.
Taints work in the opposite direction: a tainted node repels every pod that does not explicitly tolerate the taint. This keeps a pool reserved instead of merely preferred.
They are used together when a Node Pool must be dedicated to one workload:
- the label lets the right pod select the pool;
- the taint stops every other pod from landing on it.
Typical cases are database or stateful workloads that must not share nodes with the rest of the cluster, GPU pools that should only run GPU jobs, and pools with a licensed or expensive flavor.
Taint effects:
- NoSchedule - new pods without a matching toleration are not scheduled on the node;
- PreferNoSchedule - the scheduler avoids the node, but may still use it if no other node fits;
- NoExecute - new pods are not scheduled and the running pods without a matching toleration are evicted.
Example. The Node Pool test-pool gets the label compute=database and the taint compute=database:NoSchedule. Only a pod that selects the label and tolerates the taint is scheduled on this pool:
apiVersion: v1
kind: Pod
metadata:
  name: postgres
spec:
  nodeSelector:
    compute: database
  tolerations:
    - key: compute
      operator: Equal
      value: database
      effect: NoSchedule
  containers:
    - name: postgres
      image: postgres:16
A pod without this toleration is never scheduled on test-pool, even when the pool is idle.
Upgrade Node Pool
To upgrade the Node Pool, do the following:
- identify the Node Pool, that you want to upgrade, on the Cluster details page;
- click on the Actions icon and select the Upgrade in the list of available options;
- select the version to which you want to upgrade the selected Node Pool on the opened Upgrade Node Pool window and click on the UPGRADE icon:
Cluster Features
Kubernetes clusters support a set of optional features that can be switched on or off to extend the cluster’s capabilities. These features can be enabled during Cluster creation or changed at any time from the Cluster details page.
📌 The list below reflects the features available at the moment and will be expanded over time.
To manage cluster features, do the following:
- go to the Cluster details page;
- open the SETTINGS tab;
- switch the required features on or off and click on the SAVE icon:
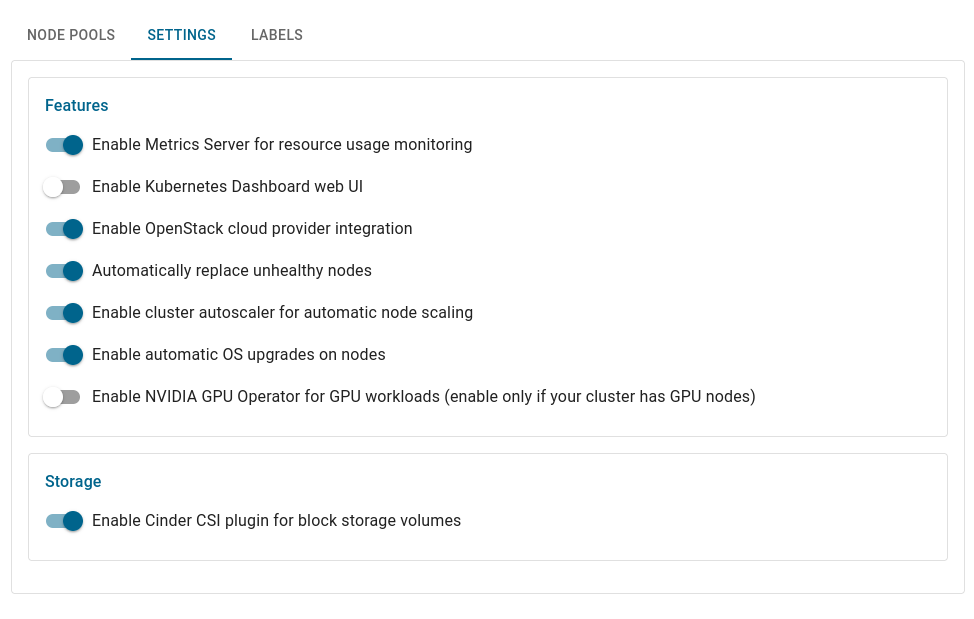
Features
- Enable Metrics Server for resource usage monitoring;
- Enable Kubernetes Dashboard web UI;
- Enable OpenStack cloud provider integration;
- Automatically replace unhealthy nodes;
- Enable cluster autoscaler for automatic node scaling;
- Enable NVIDIA GPU Operator for GPU workloads.
💡 Enable this option only if your cluster has GPU nodes.
Storage
- Enable Cinder CSI plugin for block storage volumes.
After these steps, the selected features will be applied to the Cluster.
Enable OS Upgrade
Automatic OS upgrades keep the underlying operating system of your cluster nodes patched and up to date, so nodes receive security and stability fixes without manual intervention.
To enable automatic OS upgrades, do the following:
- go to the Cluster details page;
- open the SETTINGS tab;
- switch on the Enable automatic OS upgrades on nodes option and click on the SAVE icon:
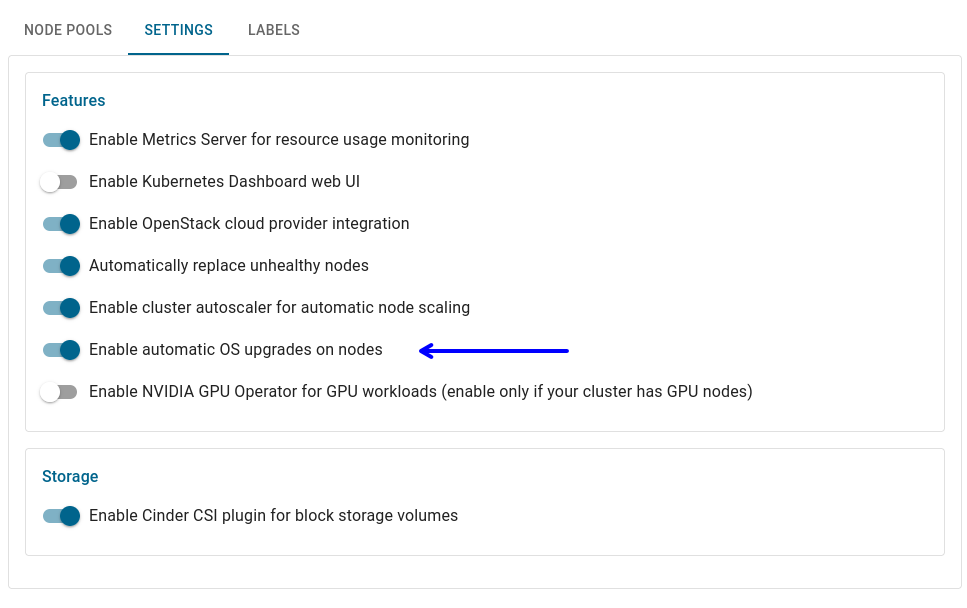
After these steps, cluster nodes will be upgraded to the latest available OS image automatically.
💡 The upgrade does not start immediately after you enable the option. Each node is scheduled its own upgrade time, so nodes are updated one at a time rather than all at once. This keeps your workloads running and avoids cluster downtime during the OS upgrade.
Upgrade Cluster
📌 For cluster upgrading you can select only a version that is higher than current one or you can choose the current version to re-apply the configuration.
To upgrade the Cluster, do the following:
- identify the Cluster, that you want to upgrade, on the Clusters page;
- go to the Cluster details page;
- click on the Actions icon and select the Upgrade in the list of available options;
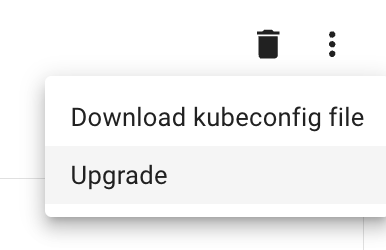
- select the version to which you want to upgrade the selected Cluster on the opened Upgrade Cluster window and click on the UPGRADE icon:
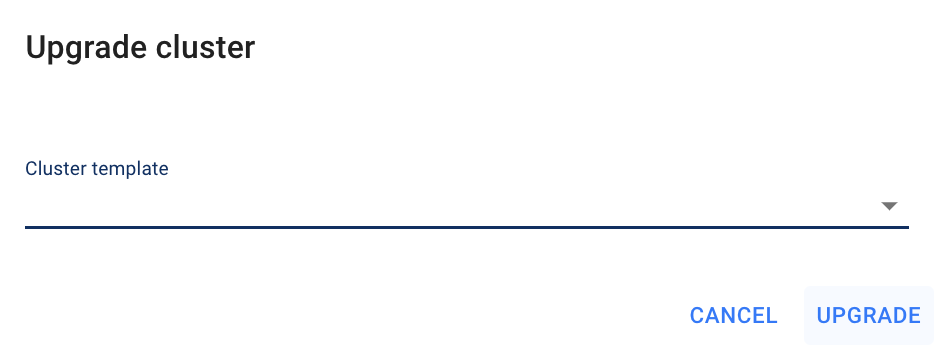
After these steps, the selected Cluster will be upgraded after a few minutes with the status UPDATE_COMPLETE.
Rotate Certificate Authority
Rotating the Certificate Authority (CA) replaces the cluster’s CA certificates and keys. Use it for regular security compliance or when the current certificates are compromised or approaching expiry.
📌 After a CA rotation the previous cluster credentials become invalid. Download a new kubeconfig file to continue accessing the cluster.
To rotate the cluster CA, do the following:
- go to the Cluster details page;
- click on the Actions icon and select the Rotate CA in the list of available options;
- confirm the CA rotation on the next opened Confirmation window:
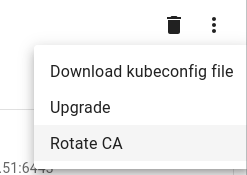
After these steps, the cluster CA will be rotated after a few minutes.
Download kubeconfig file
💡 The kubeconfig file is required to configure access to a cluster and switch between multiple clusters, multiple users, and with different authentication mechanisms such as passwords or tokens.
To download the kubeconfig file that pertains to Cluster, do the following:
- identify this desired Cluster on the Clusters page;
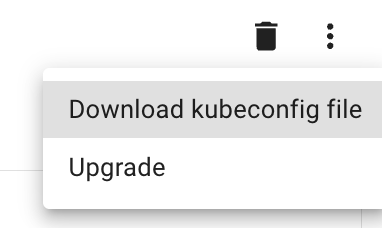
- click on the Actions icon and select the Download kubeconfig file in the list of available options.
After these steps, the kubeconfig file will be downloaded.
Also, you can download the kubeconfig file from Cluster details page, by clicking on the appropriative quick actions icon there:
Delete Cluster
To delete the Cluster, do the following:
- identify this unnecessary Cluster on the Clusters page;
- click on the Actions icon and select the Delete in the list of available options;
- confirm the Cluster deletion on the next opened Confirmation window.
After these steps, the selected Cluster will be deleted after a few minutes.
Also, you can delete the Cluster from Cluster details page, by clicking on the appropriative quick actions icon there: