Object Storage Credentials
On this page, you can find an explanation of what Object Storage is and what Object Storage Credentials are in the Cloud Console. It also covers the available access methods for Object Storage, as well as instructions on how to create, delete, and manage master keys and subusers in the Cloud Console.
Table of contents
Introduction
What is Object Storage?
The Cloud Console Object Storage makes it possible to store data simply and cost-effectively. It provides a fully distributed, API-accessible storage platform that can be integrated directly into applications or used for backup, archiving, and data retention.
It’s built for scale and optimized for durability, availability, and concurrency across the entire data set.
An Object Storage API differs from a conventional filesystem: instead of directories and files, you manipulate containers where you store objects. A container can hold millions of objects.
There is no notion of hierarchy with containers: you cannot nest a container within another, however, you can emulate a nested folder structure with a naming convention for your objects.
Object Storage access methods
We can access Object Storage using different methods:
Integrated S3-Browser: The Cloud Console provides its own integrated S3-Browser, which offers a user-friendly interface to manage your Object Storage resources. This browser allows you to browse through folders and files, create new folders, upload files, and perform various other management tasks directly within the Cloud Console.
APIs: You can also interact with Object Storage using different APIs (Application Programming Interfaces). APIs enable developers to programmatically access and manipulate Object Storage resources, allowing for more customized and automated workflows.
Third-Party Tools: Additionally, you have the option to use third-party tools like S3 Browser and Cyberduck, which provide alternative interfaces for managing Object Storage. These tools may offer additional features and functionalities not available in the integrated S3-Browser, catering to specific user preferences and requirements.
By offering multiple options to access Object Storage, the Cloud Console allows users to choose the most suitable approach for their storage management needs. Whether through the integrated S3-Browser, APIs, or third-party tools, users can efficiently interact with and manage their Object Storage resources.
But before we start to configure and use Object Storage we need to create credentials that include the access key and secret key and will enable secure access to your Object Storage resources, allowing you to manage and interact with your data. In the Cloud Console there are two kinds of credentials:
- Master keys - the project’s own credentials, which provide full access to all buckets and objects in the project;
- Subusers - separate identities with their own access keys and a limited access level, for example, for different applications or users.
Object Storage page
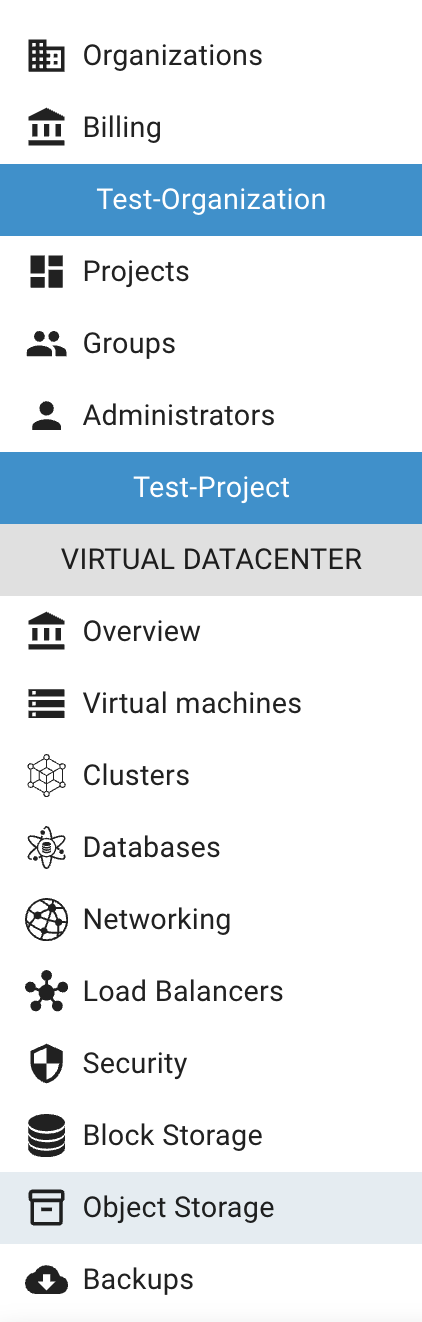
To get to the Object Storage page, select Object Storage from the VIRTUAL DATACENTER block in the side-bar menu:
At the top of the page you can find the project’s connection details and the Take a tour icon: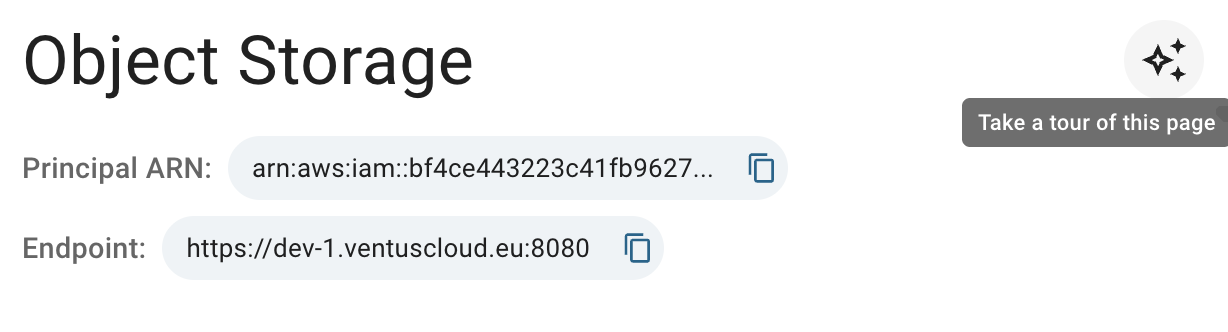
- Principal ARN - the unique identifier of the project’s S3 user. Use it in bucket policies to grant or deny this user access to a bucket. It has the format
arn:aws:iam::<project_id>:user/<project_id>; - Endpoint - the S3 endpoint to use in S3 clients and tools.
💡 Take a tour of the page: click on the ✨ icon in the upper right corner of the Object Storage page to start an interactive tour. It walks you through the page step by step: master keys, subusers and their access levels, bucket policy examples and the buckets list. If the project has no master key yet, the tour helps you create the first one.
Below them, the page consists of two tabs:
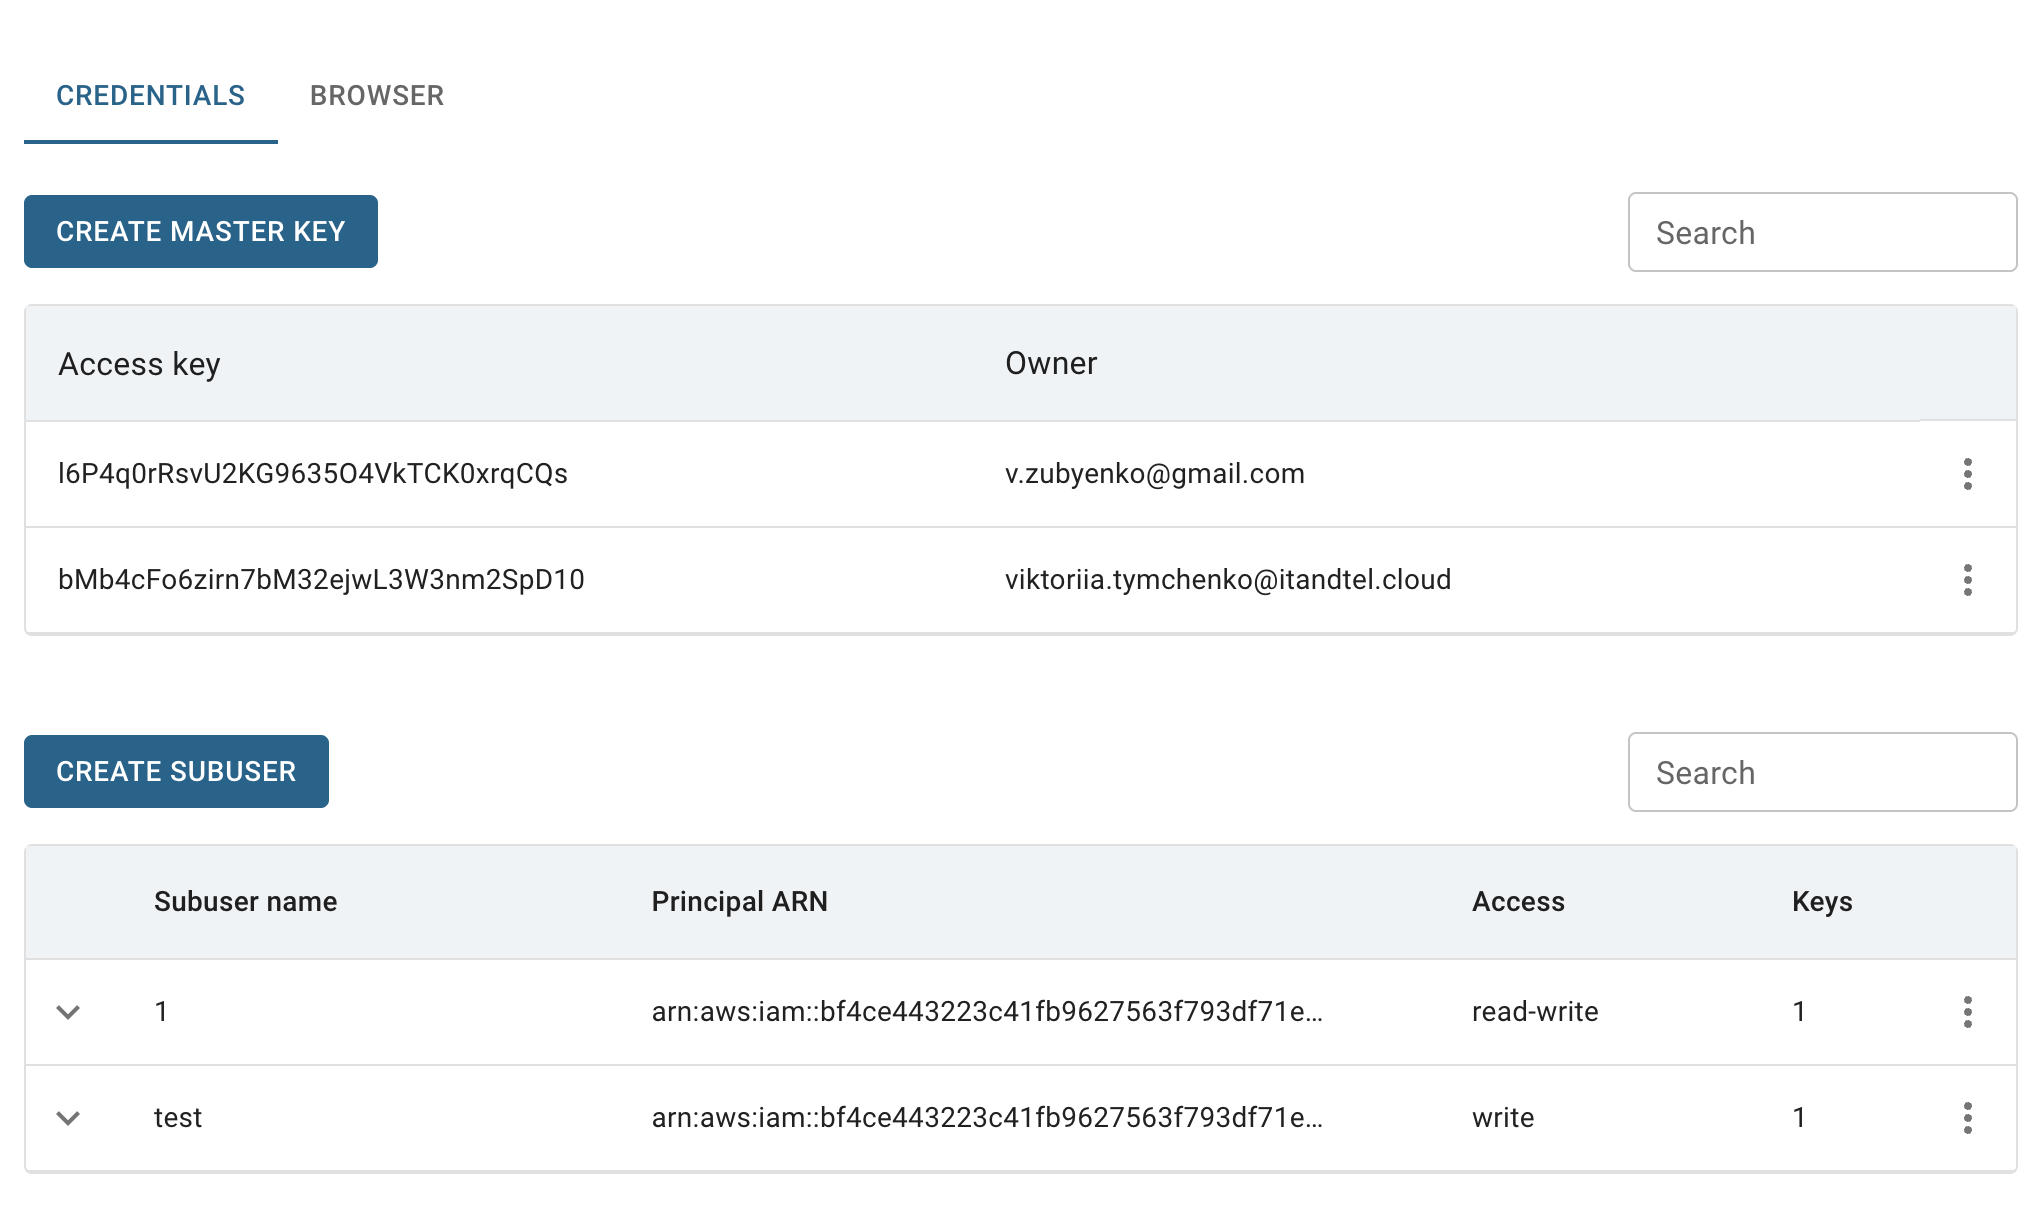
CREDENTIALS - the project’s master keys and subusers with their own access keys:
BROWSER - the integrated S3-Browser with all buckets of the project. This tab is available only when the project has a master key:
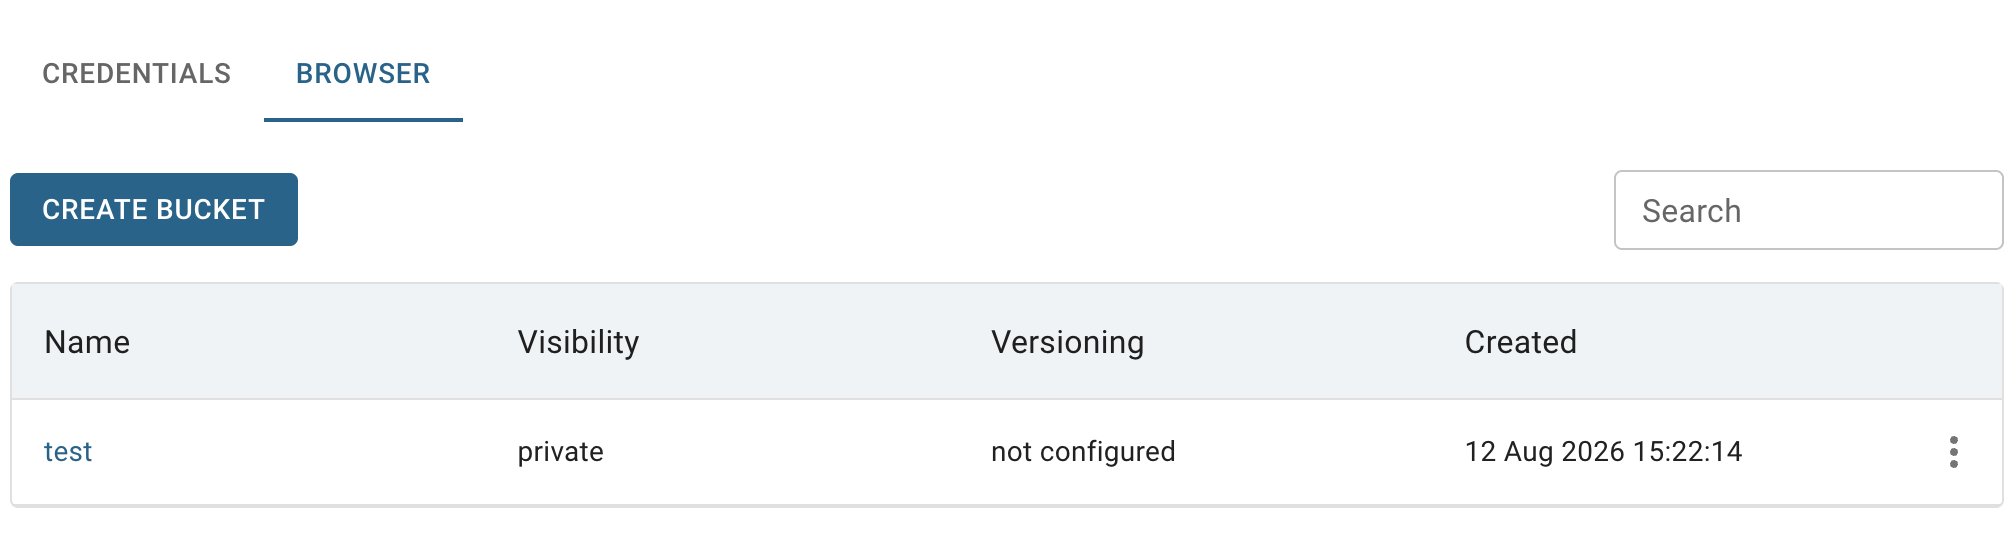
💡 In this article, we focus on the CREDENTIALS tab, where you can manage master keys and subusers.
💡 Information how to manage buckets and files in the BROWSER tab, you can find in the article Integrated S3-Browser.
Master keys
Master keys are the project’s main credentials. They provide full access to all buckets and objects in the project. You can create as many master keys as you need.
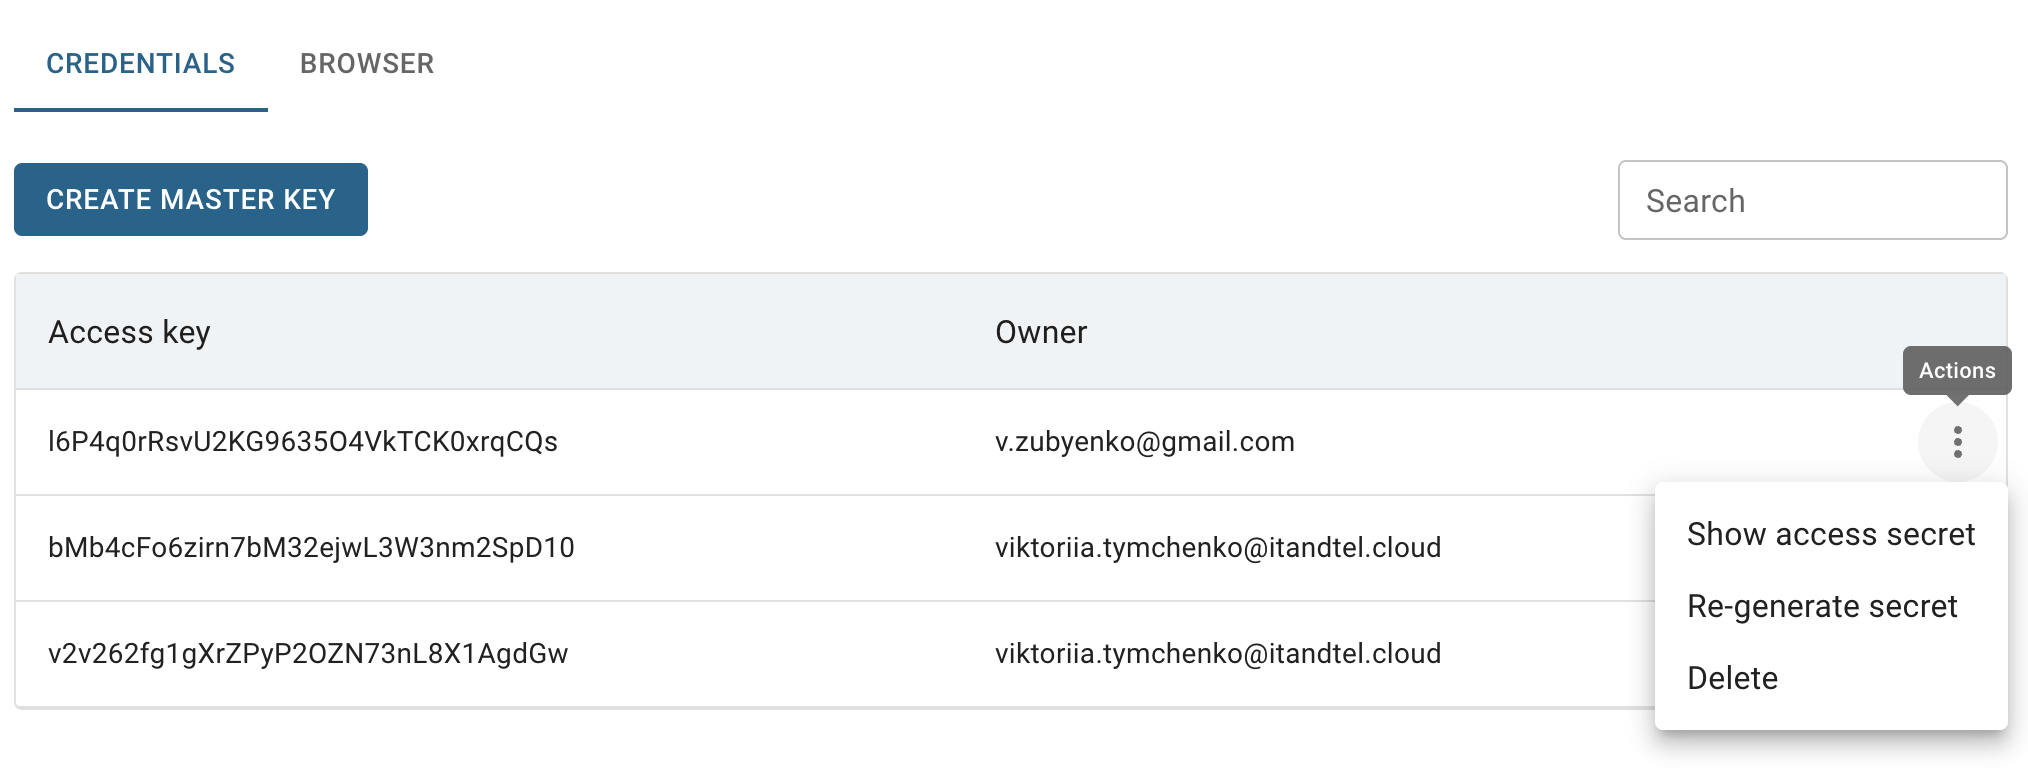
The Master keys table on the CREDENTIALS tab shows the Access key and the Owner of each key, has a Search bar and an Actions icon for every key, which opens the next list of available management actions:
- Show access secret - view the secret associated with the access key. Both the access key and the secret are required to connect to S3;
- Re-generate secret - create a new secret for the access key. The old secret stops working;
- Delete - delete the master key.
Create master key
To create a new master key in the Cloud Console, do the following:
- go to the CREDENTIALS tab of the Object Storage page and click on the CREATE MASTER KEY button;
- confirm your action on the next opened window by clicking on the CREATE button.
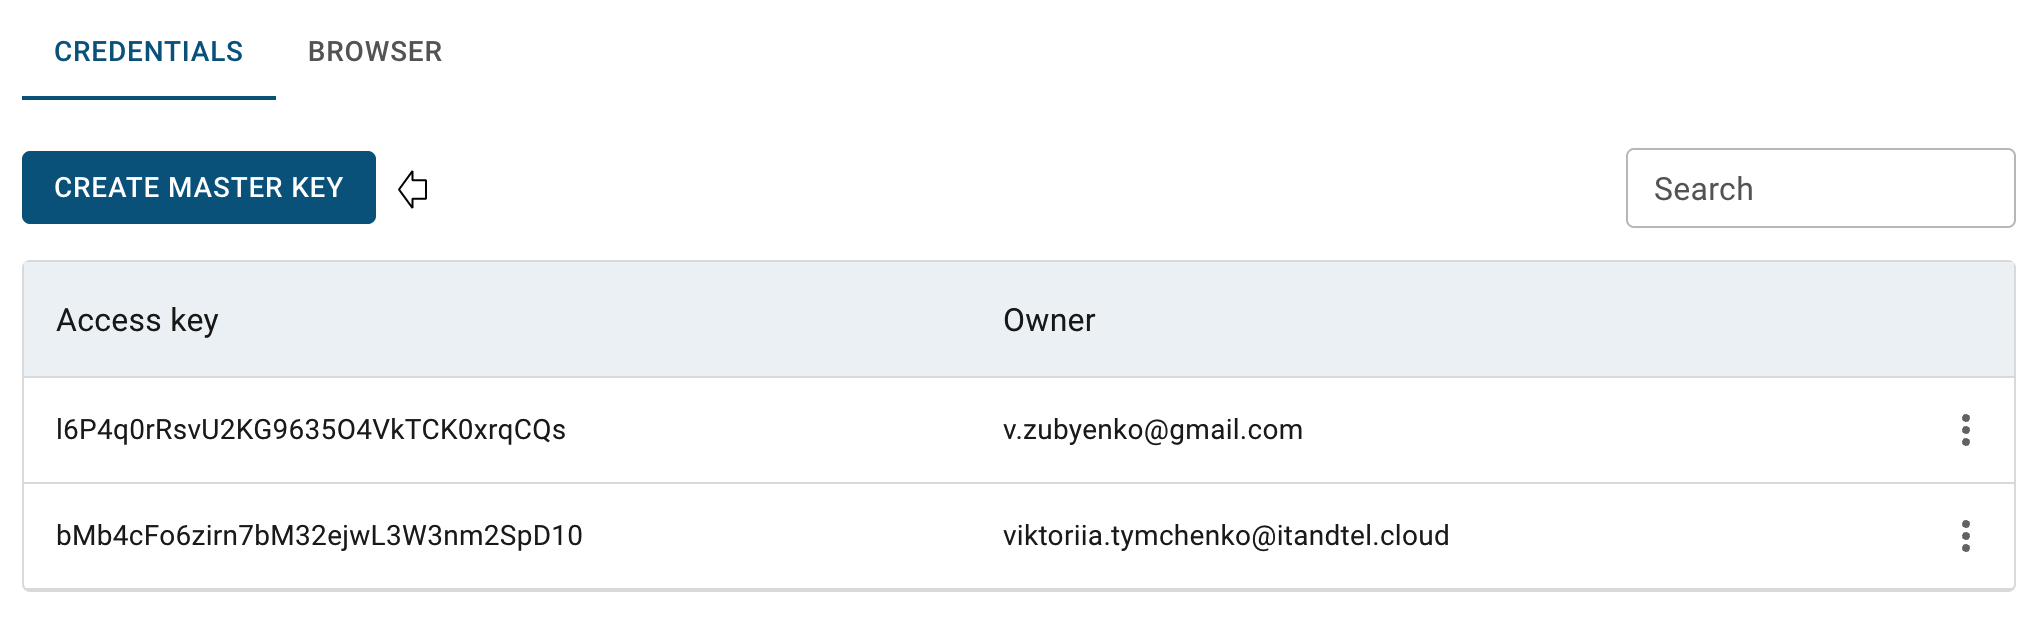
The next opened window will provide your access secret and you can save it by clicking on the COPY TO CLIPBOARD button.
After these steps, the newly created master key will be added to the master keys table.
Once the first master key is created in the project, the Subusers block and the BROWSER tab with the integrated S3-Browser become available.
Next steps, how to use the credentials to connect to the Cloud Object Storage in different ways you can find in the next articles - Integrated S3-Browser and Object Storage Clients.
Show access secret
To show again the secret of a master key, do the following:
- on the CREDENTIALS tab identify the master key whose secret you want to get;
- click on the Actions icon and select Show access secret in the list of available options;
- confirm your action on the next opened window by clicking on the SHOW button.
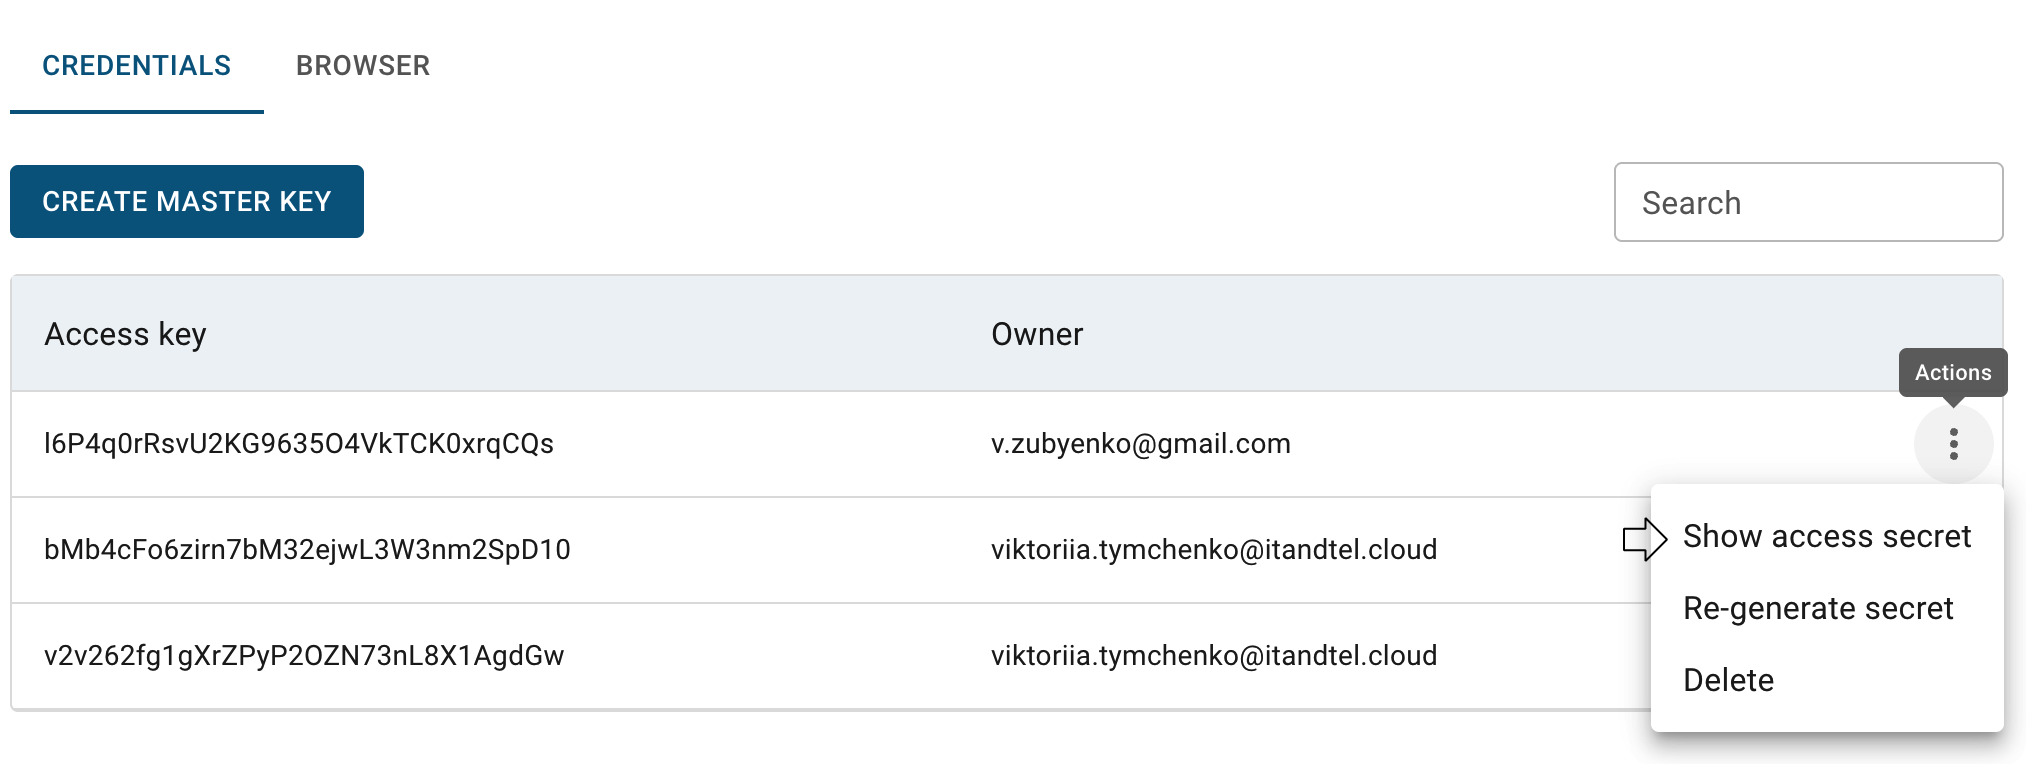
After these steps, the next opened window will again provide your access secret and you can save it by clicking on the COPY TO CLIPBOARD button.
Re-generate secret
To re-generate the secret of a master key, do the following:
- on the CREDENTIALS tab identify the master key whose secret you want to re-generate;
- click on the Actions icon and select Re-generate secret in the list of available options;
- confirm your action on the next opened window by clicking on the RE-GENERATE SECRET button.
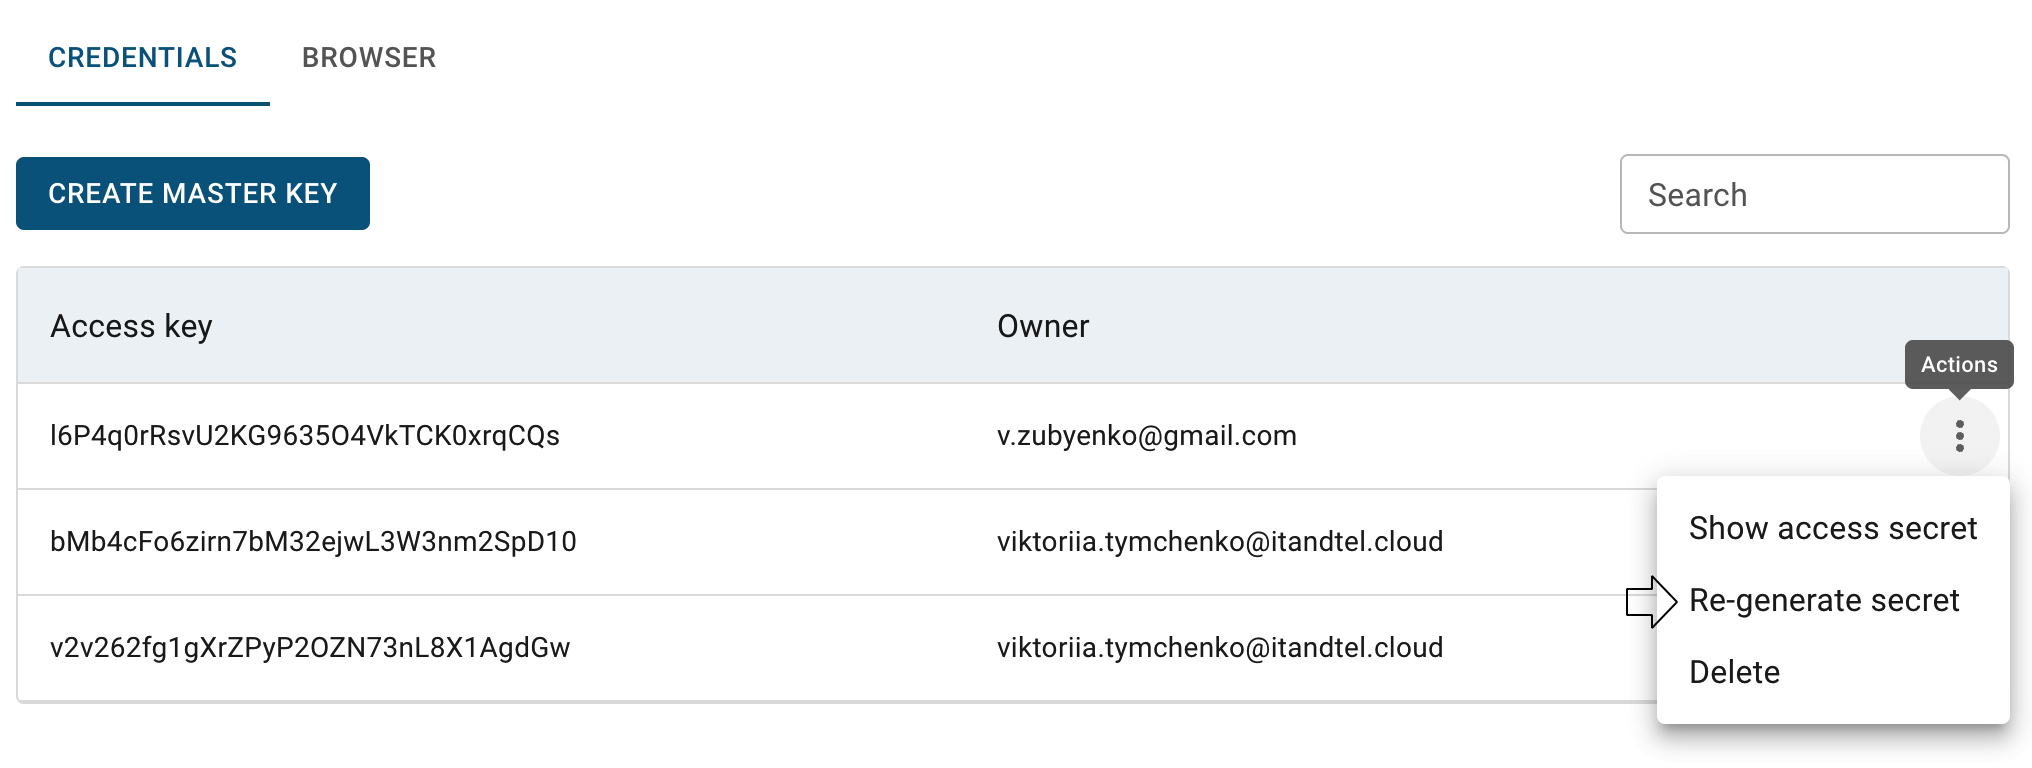
After these steps, the next opened window will provide your new access secret and you can save it by clicking on the COPY TO CLIPBOARD button.
📌 After re-generating, the old secret stops working. Update it in every application or tool that uses this master key.
Delete master key
To delete a master key, do the following:
- identify the unnecessary master key on the CREDENTIALS tab;
- click on the Actions icon and select Delete in the list of available options;
- confirm the deletion on the next opened Confirmation window by clicking on the DELETE button.
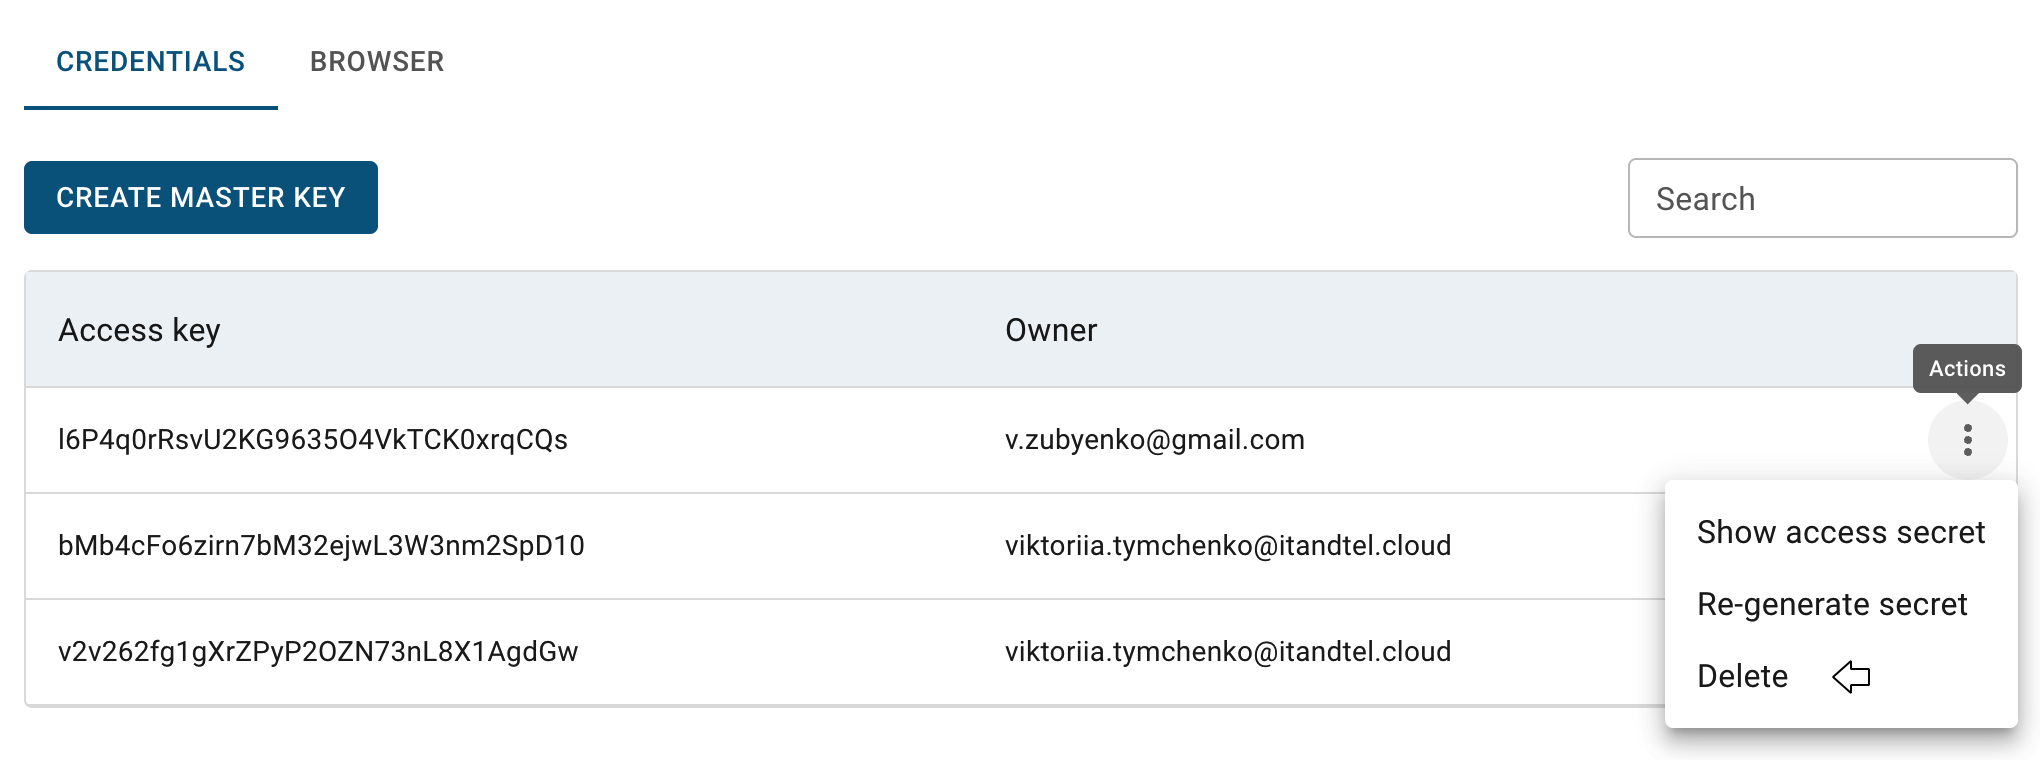
After these steps, the selected master key will be deleted.
Subusers
A subuser is a separate identity with its own access keys and access level. It can access the project’s buckets only according to the permissions assigned to it and the bucket policies, which allow you to control access levels more precisely, while a master key always has full access to all buckets of the project.
📌 Subusers can be managed only when the project has at least one master key.
You can create as many subusers as you need, for example, for different applications or users. Deleting one subuser does not affect the others.
Each subuser can also have several access keys with the same access level - see Manage subuser keys.
Create subuser
To create a new subuser, do the following:
- go to the CREDENTIALS tab of the Object Storage page and click on the CREATE SUBUSER button;
- specify the Name of the subuser (it must be unique within the project);
- select the Access level - the description of the selected level is shown below the buttons (see Subuser access levels);
- click on the CREATE button:
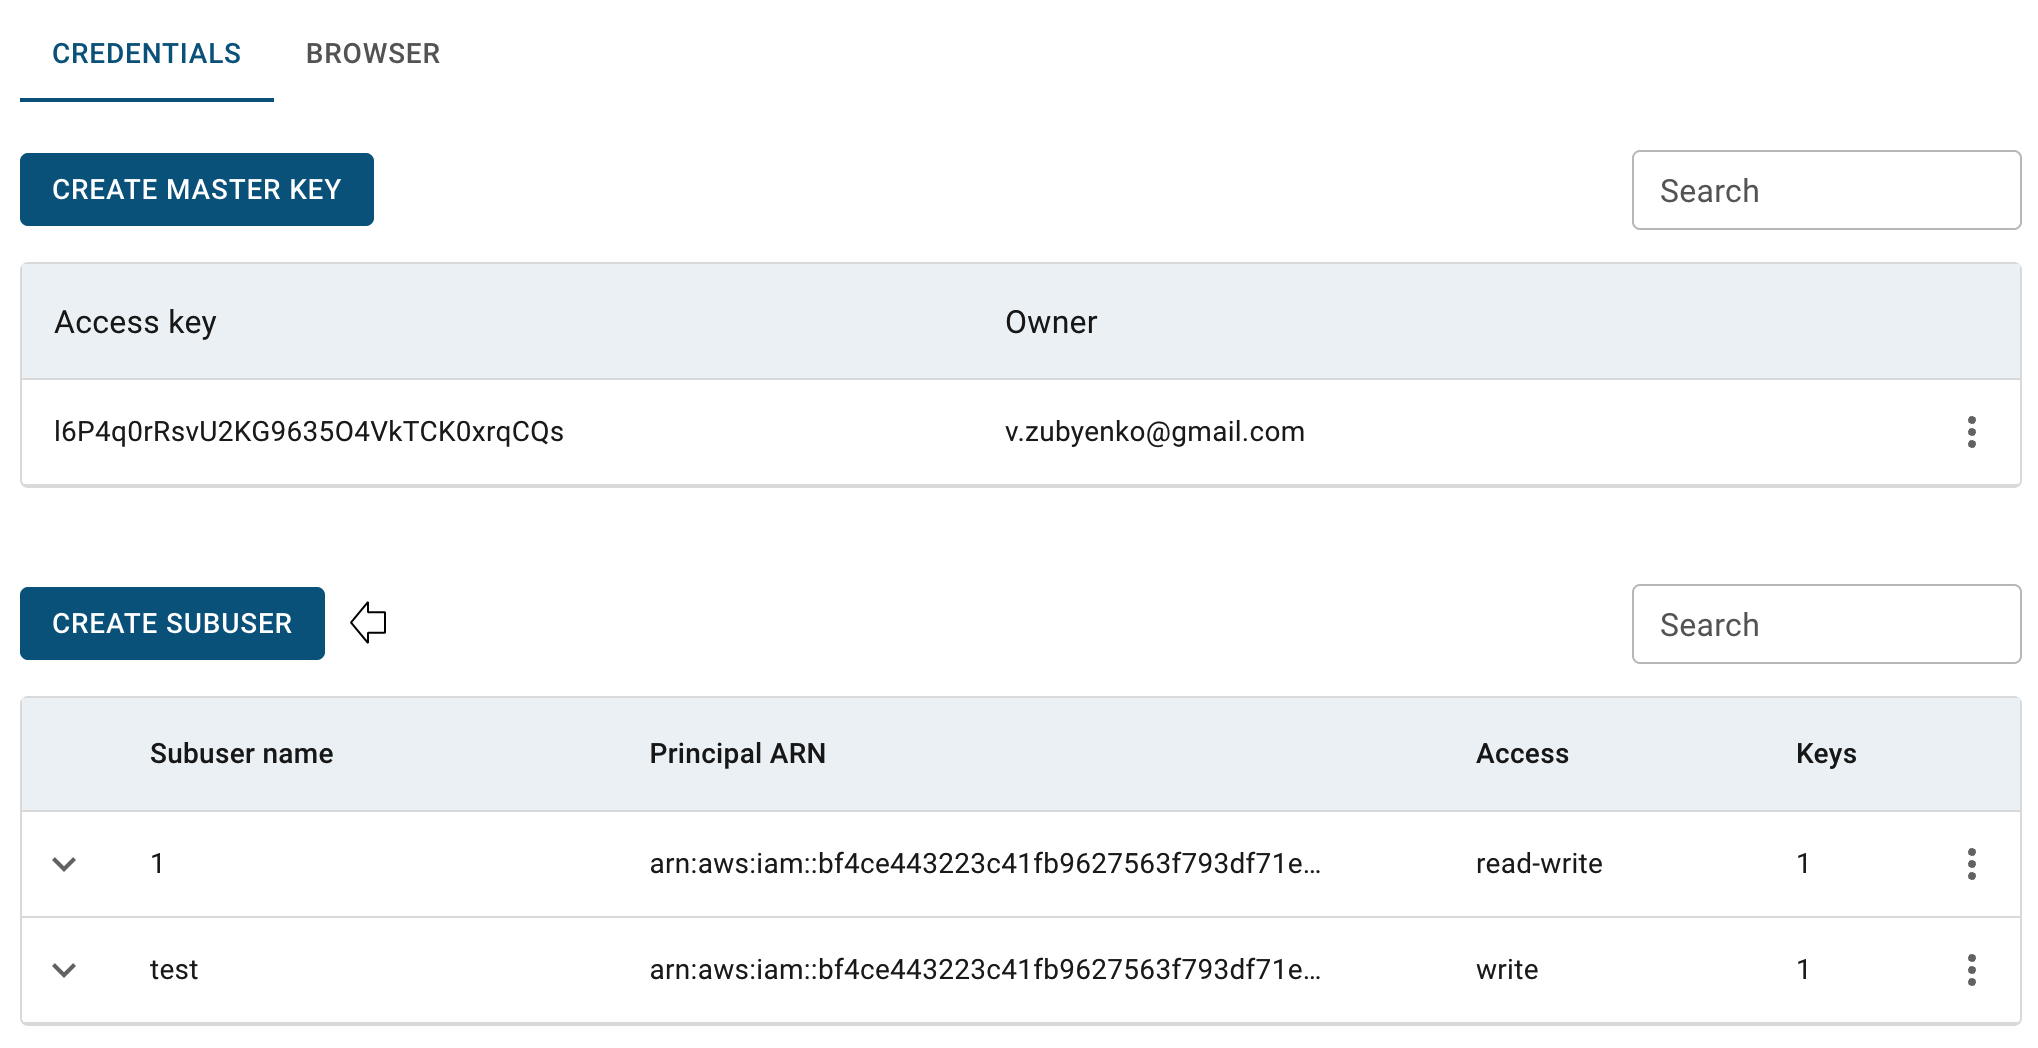
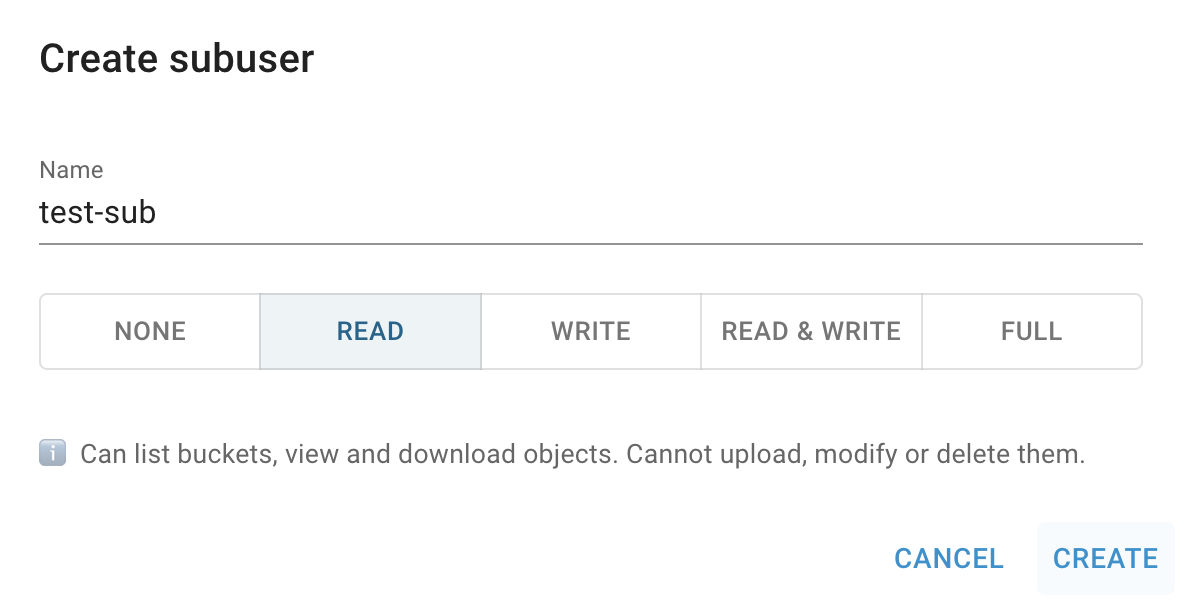
After these steps, the newly created subuser will be added to the subusers table together with its first access key. To get the secret of this key, see Manage subuser keys.
Subuser access levels
The access level defines what the subuser can do. It applies to all buckets of the project:
- None - no access by default. Use bucket policies to grant access to specific buckets;
- Read - can list buckets, view and download objects. Cannot upload, modify or delete them;
- Write - can upload and delete objects. Cannot read or download them by default;
- Read & write - can view, download, upload and delete objects. Cannot manage bucket policies;
- Full - can read and write objects, plus manage bucket settings and policies.
For more precise control, use bucket policies to define access to individual buckets. Typical uses:
- give a subuser access to one bucket only;
- block requests that do not come from your office or VPN IP addresses;
- keep one bucket read-only for everyone except its owner.
Ready-to-use policies for each of these cases you can find in the Bucket policy examples section.
📌 Bucket policies are configured through the S3 API, for example using the AWS CLI. You can view the current policy of a bucket in the integrated S3-Browser - see View bucket policies.
Bucket policy examples
Below you can find examples of bucket policies for typical cases. Add a policy to the bucket through the S3 API, for example using the AWS CLI, and replace the values in angle brackets (<project_id>, <bucket_name>, etc.) with your own.
Example 1: give a subuser access to one bucket only
To let a subuser work with one bucket only, do the following:
- create the subuser with the None access level (see Create subuser);
- add the following bucket policy to the bucket, replacing
<project_id>,<subuser_name>and<bucket_name>with your values:
{
  "Version": "2012-10-17",
  "Statement": [
    {
      "Sid": "SubuserListBucket",
      "Effect": "Allow",
      "Principal": { "AWS": ["arn:aws:iam::<project_id>:user/<project_id>:<subuser_name>"] },
      "Action": ["s3:ListBucket"],
      "Resource": ["arn:aws:s3:::<bucket_name>"]
    },
    {
      "Sid": "SubuserObjectReadWrite",
      "Effect": "Allow",
      "Principal": { "AWS": ["arn:aws:iam::<project_id>:user/<project_id>:<subuser_name>"] },
      "Action": ["s3:GetObject", "s3:PutObject", "s3:DeleteObject"],
      "Resource": ["arn:aws:s3:::<bucket_name>/*"]
    }
  ]
}
After these steps, the subuser will be able to list the bucket and read, upload and delete its objects, and will have no access to any other bucket.
Example 2: block requests from outside your office or VPN
This policy denies all requests to the bucket that do not come from the specified IP addresses. Replace <bucket_name>, <office_ip_cidr> and <vpn_ip_cidr> with your values:
{
  "Version": "2012-10-17",
  "Statement": [
    {
      "Sid": "DenyRequestsOutsideAllowedIPs",
      "Effect": "Deny",
      "Principal": "*",
      "Action": "s3:*",
      "Resource": [
        "arn:aws:s3:::<bucket_name>",
        "arn:aws:s3:::<bucket_name>/*"
      ],
      "Condition": {
        "NotIpAddress": {
          "aws:SourceIp": [
            "<office_ip_cidr>",
            "<vpn_ip_cidr>"
          ]
        }
      }
    }
  ]
}
Example 3: read-only bucket for everyone except the owner
This policy allows everyone to list the bucket and download its objects, while only the project owner can upload, delete objects and change the bucket settings. Replace <project_id> and <bucket_name> with your values:
{
  "Version": "2012-10-17",
  "Statement": [
    {
      "Sid": "AllowReadOnlyForEveryone",
      "Effect": "Allow",
      "Principal": "*",
      "Action": ["s3:GetObject", "s3:ListBucket"],
      "Resource": [
        "arn:aws:s3:::<bucket_name>",
        "arn:aws:s3:::<bucket_name>/*"
      ]
    },
    {
      "Sid": "DenyWriteDeleteExceptOwner",
      "Effect": "Deny",
      "NotPrincipal": { "AWS": ["arn:aws:iam::<project_id>:user/<project_id>"] },
      "Action": [
        "s3:PutObject",
        "s3:DeleteObject",
        "s3:PutObjectAcl",
        "s3:PutBucketPolicy",
        "s3:PutBucketAcl",
        "s3:DeleteBucket"
      ],
      "Resource": [
        "arn:aws:s3:::<bucket_name>",
        "arn:aws:s3:::<bucket_name>/*"
      ]
    }
  ]
}
Bucket policy will be overwritten: changing the bucket access between private and public in the integrated S3-Browser completely overwrites the current bucket policy, including the rules added for subusers. See Make bucket public and Make bucket private.
Manage subuser keys
A subuser can have several access keys. All keys share the subuser’s access level, but each of them can be managed separately. Multiple keys make it easy to rotate credentials without downtime: create a new key, update your application, then delete the old one.
💡 Give each application or environment its own key. If one leaks, delete just that key - the others keep working.
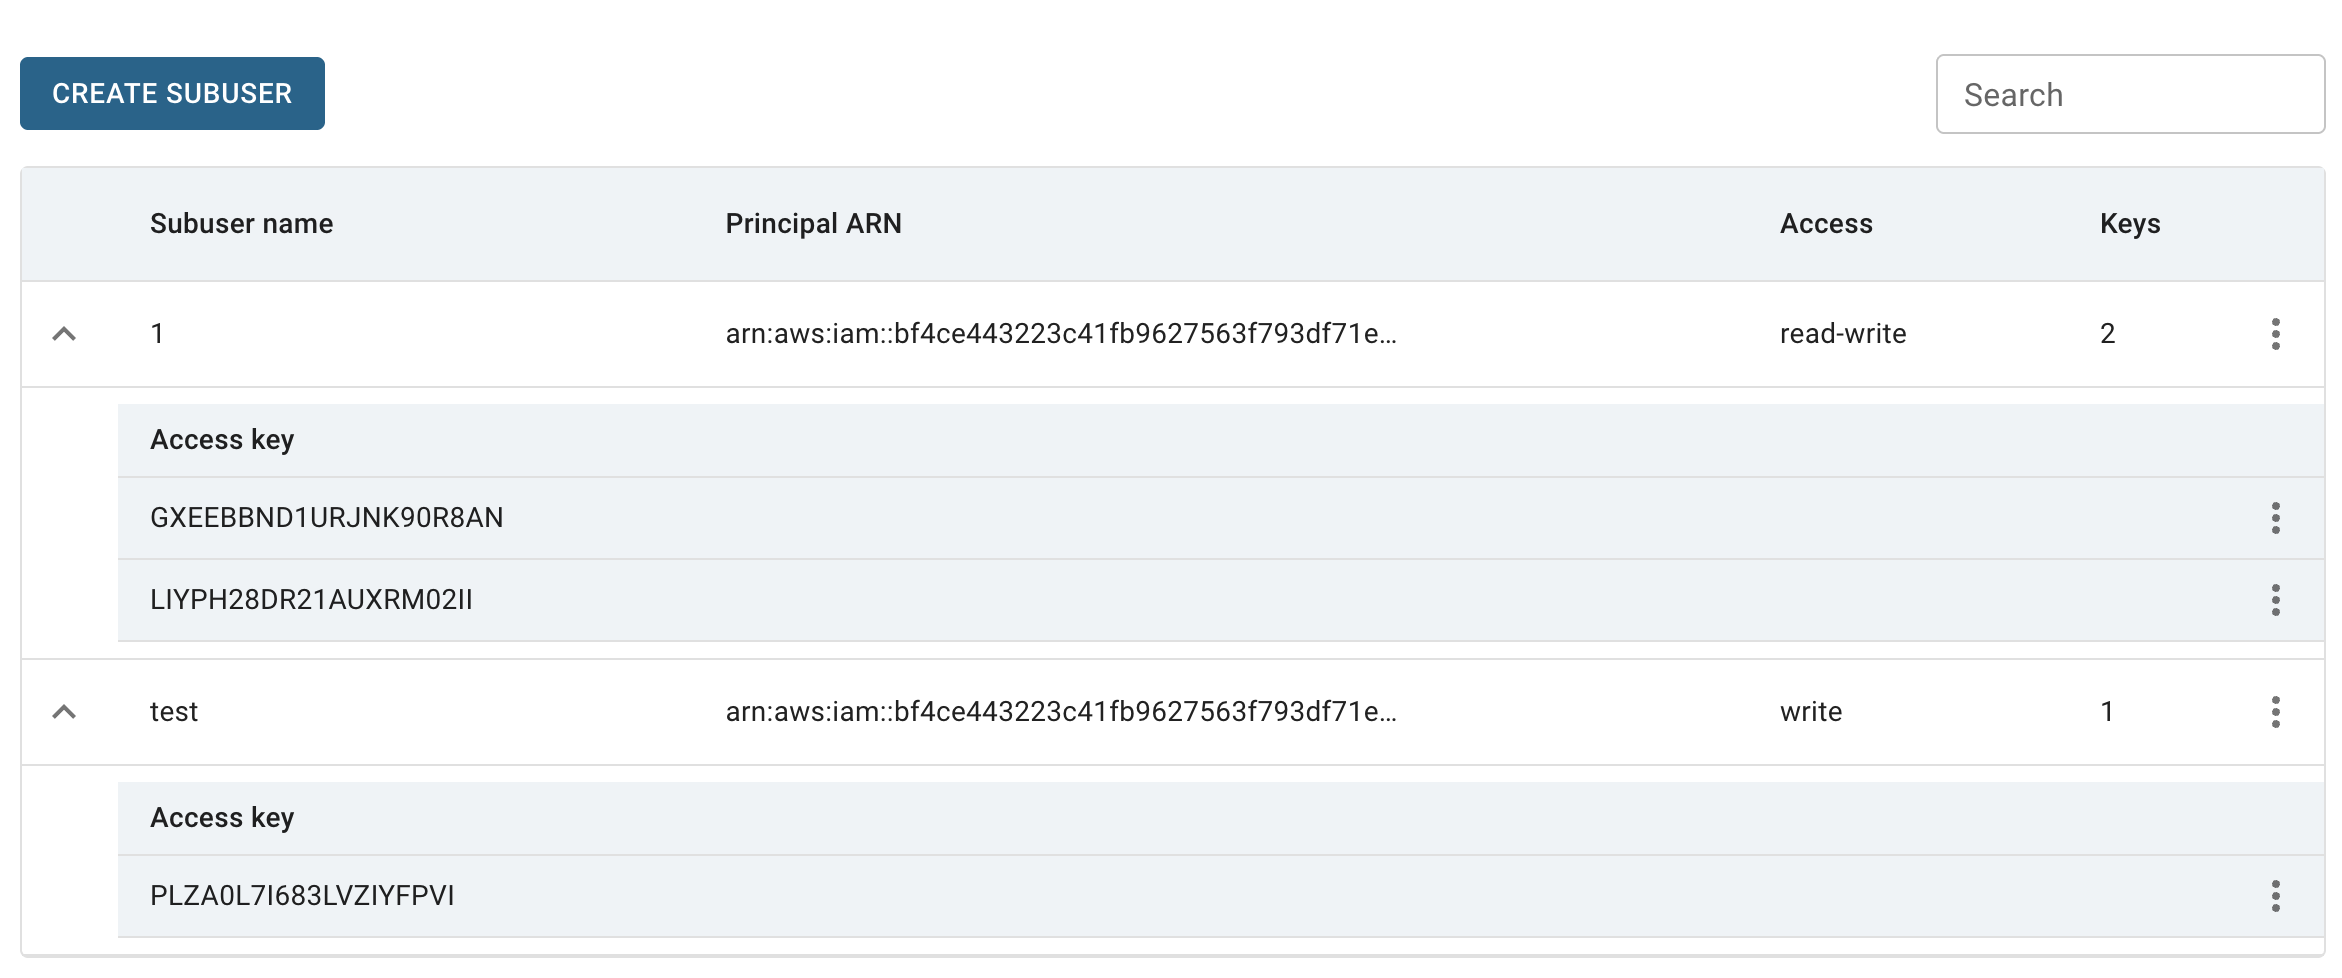
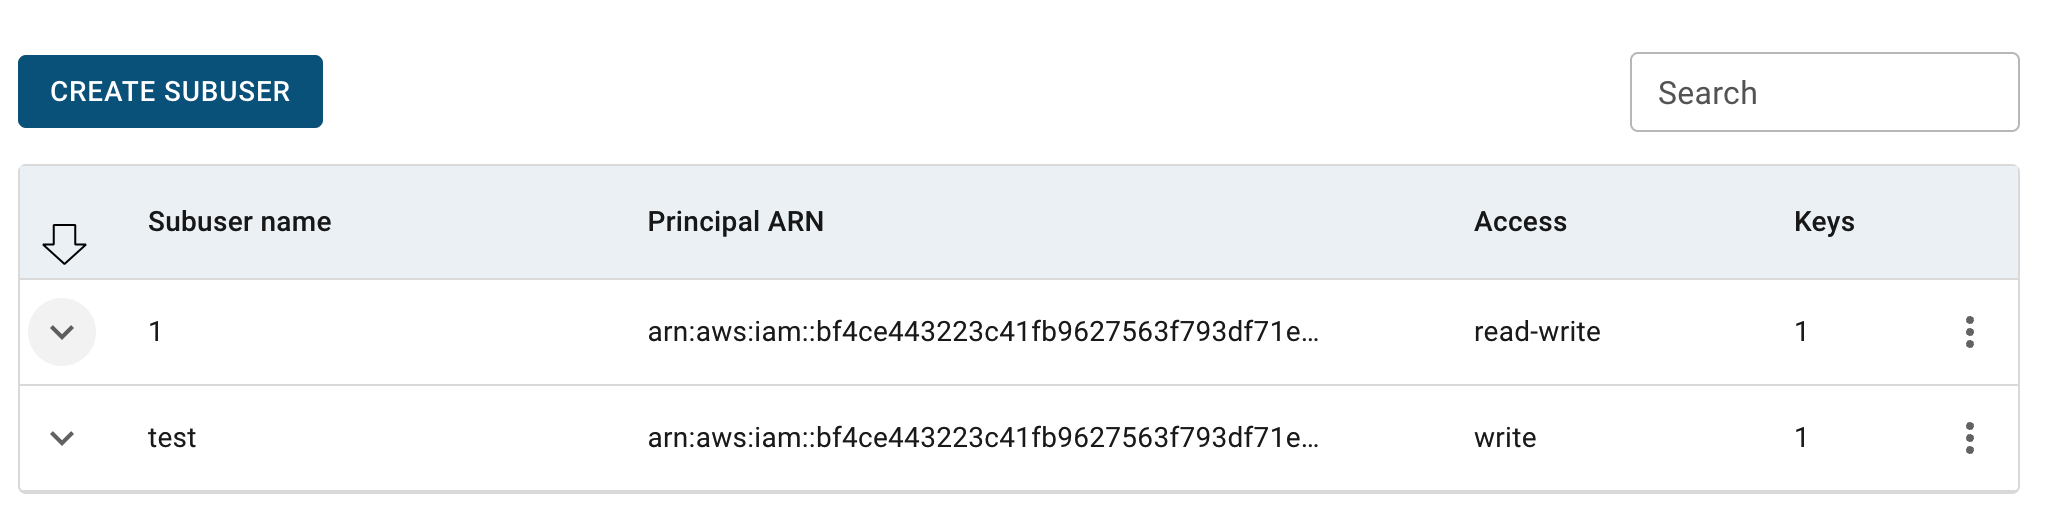
View subuser keys:
A subuser keys are hidden by default. To view them, click on the arrow next to the subuser’s name:
Add subuser key:
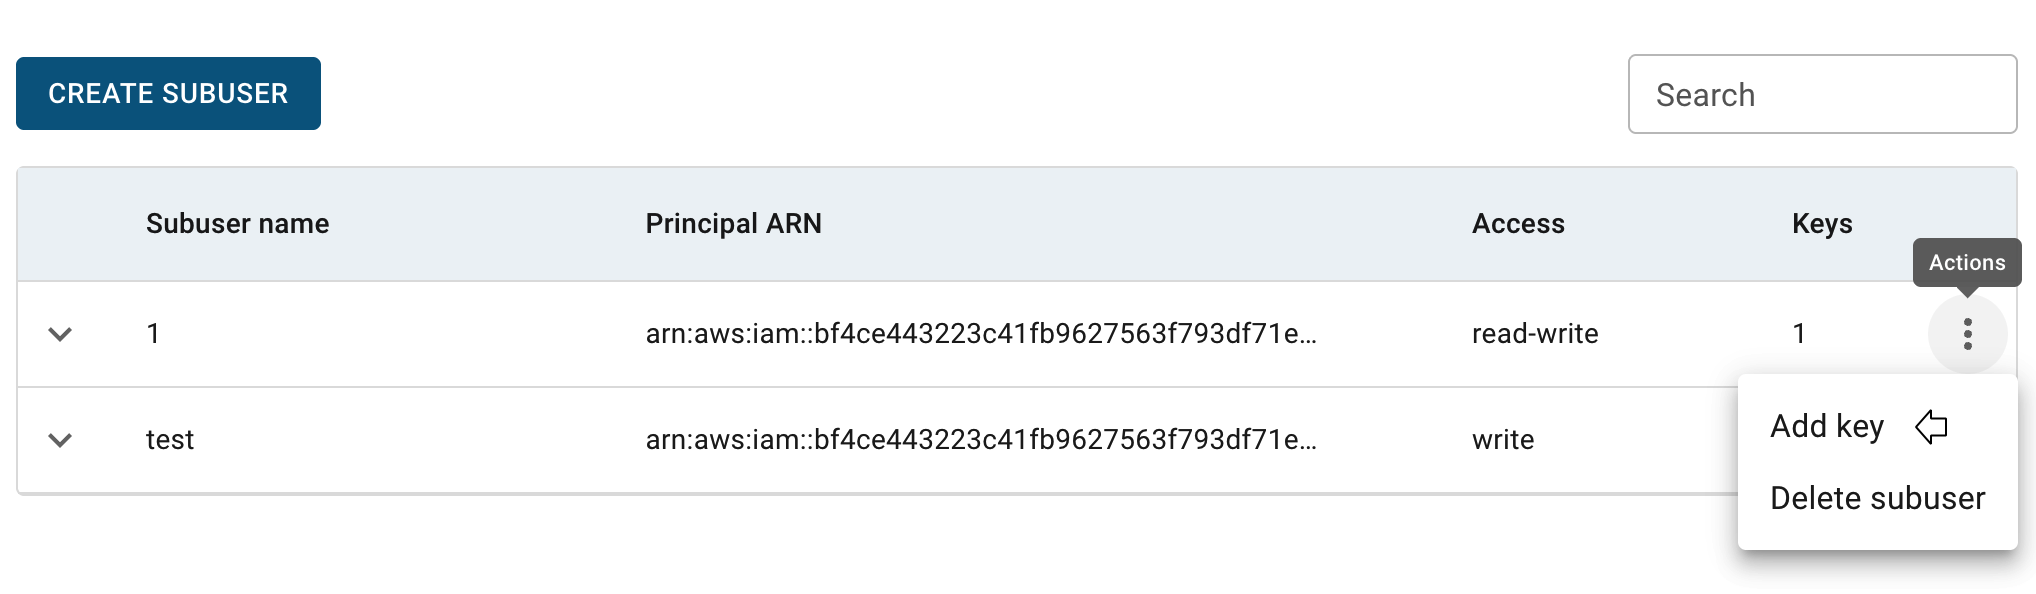
To add a new subuser key, click on the Actions icon of the subuser and select Add key, then confirm your action on the next opened Confirmation window by clicking on the ADD button:
Show subuser access secret:
To view the secret associated with an access key, click on the Actions icon of the key and select Show access secret.
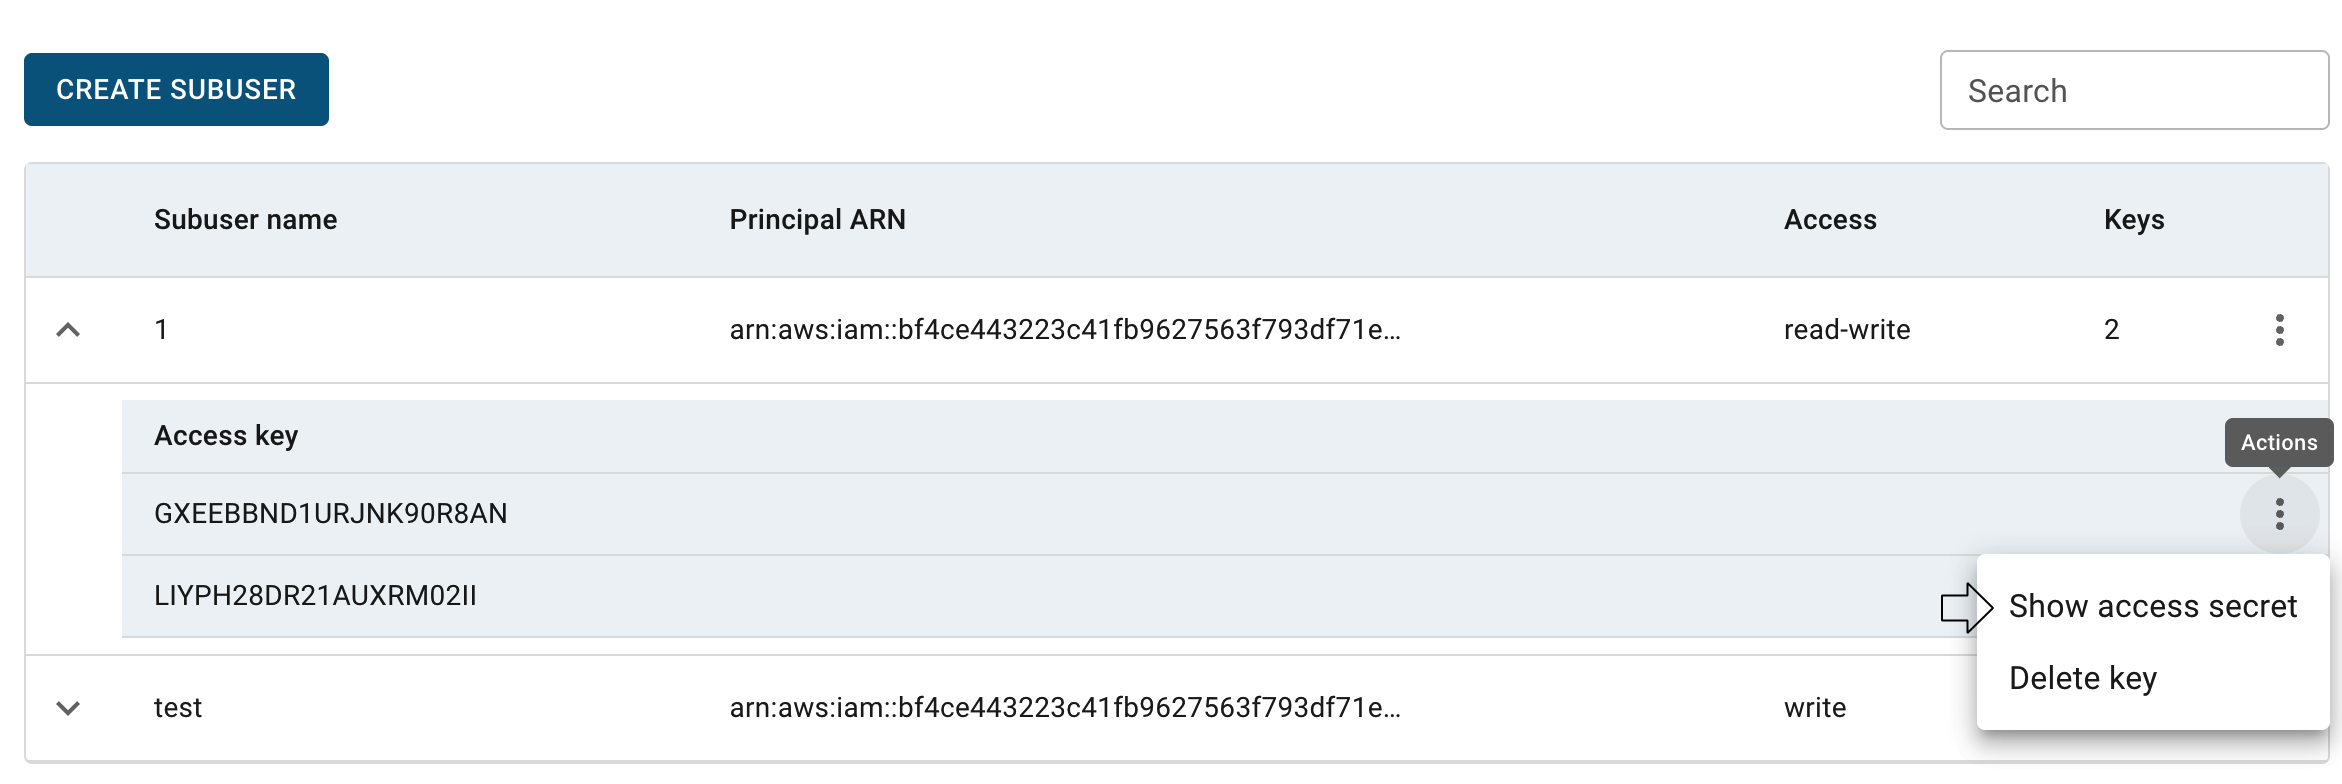
Confirm your action by clicking on the SHOW button, and the next opened window will provide the access secret, which you can save by clicking on the COPY TO CLIPBOARD button. Both the access key and the secret are required to connect to S3.
Delete subuser key:
To delete a subuser key, click on the Actions icon of the key and select Delete key, then confirm your action on the next opened Confirmation window by clicking on the DELETE button.
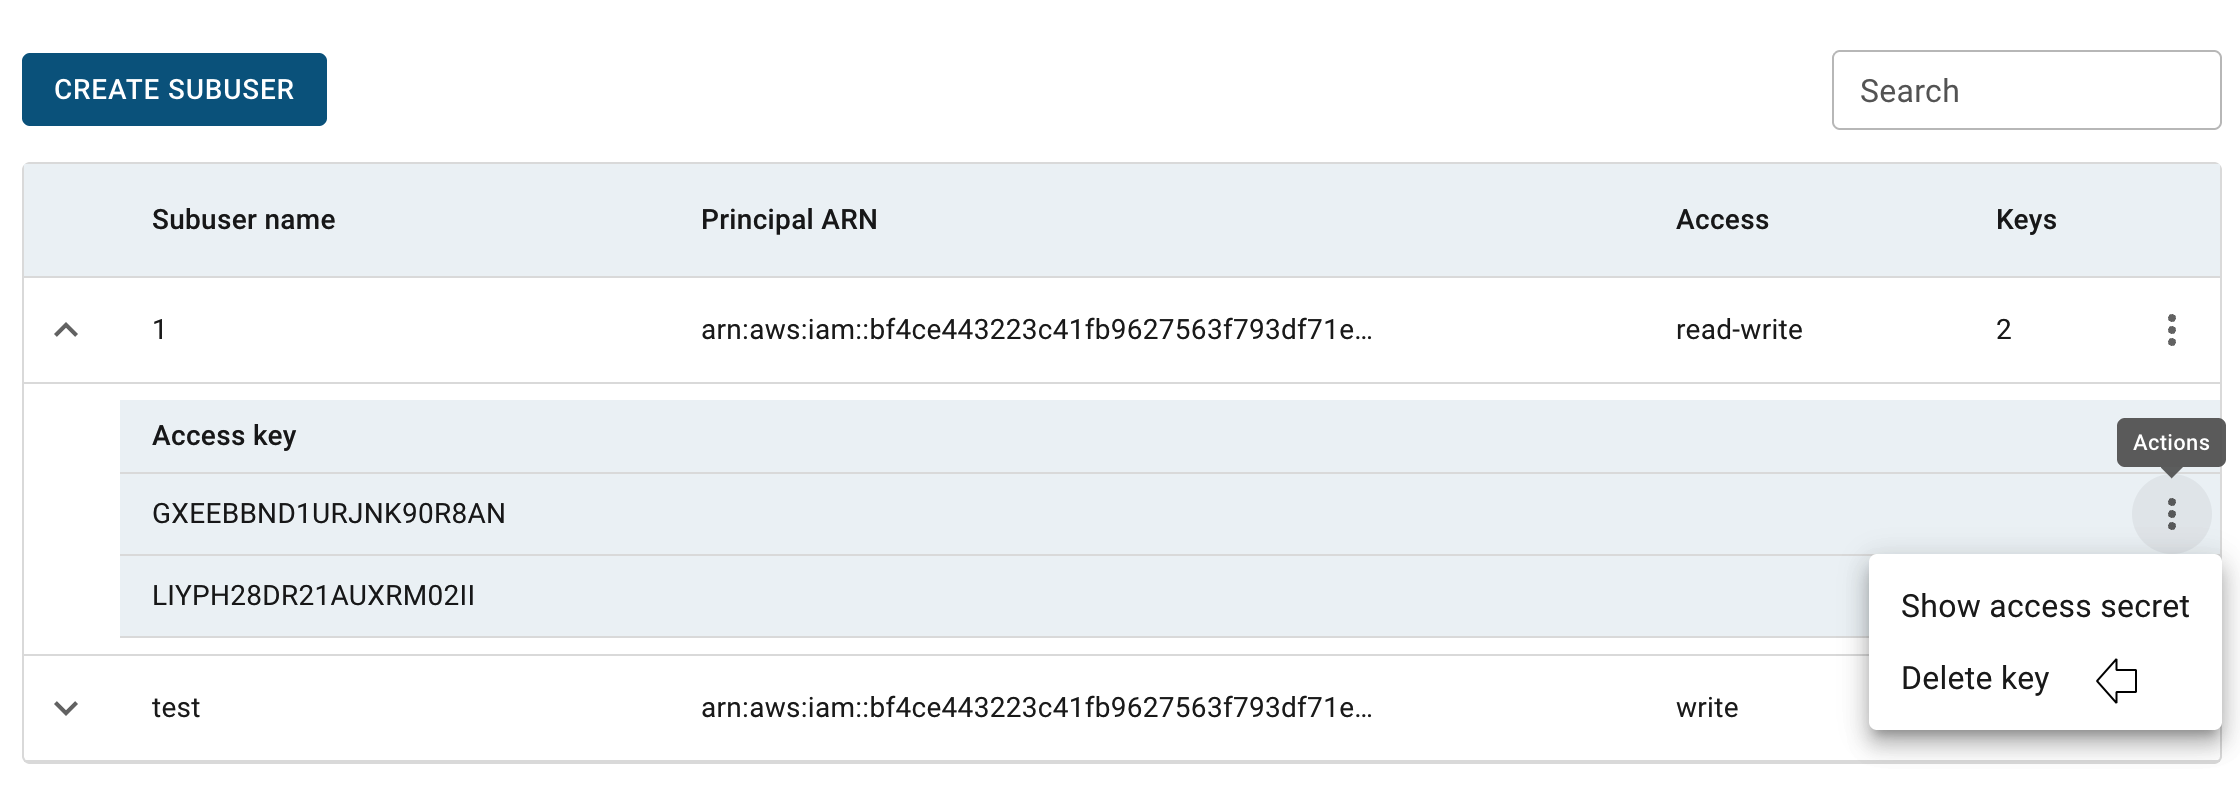
After these steps, the selected key will be deleted, while the other keys of the subuser keep working.
📌 To delete all keys of a subuser at once, delete the subuser itself - see Delete subuser.
Delete subuser
To delete a subuser, do the following:
- click on the Actions icon of the subuser in the subusers table and select Delete subuser;
- confirm your action on the next opened Confirmation window by clicking on the DELETE button.
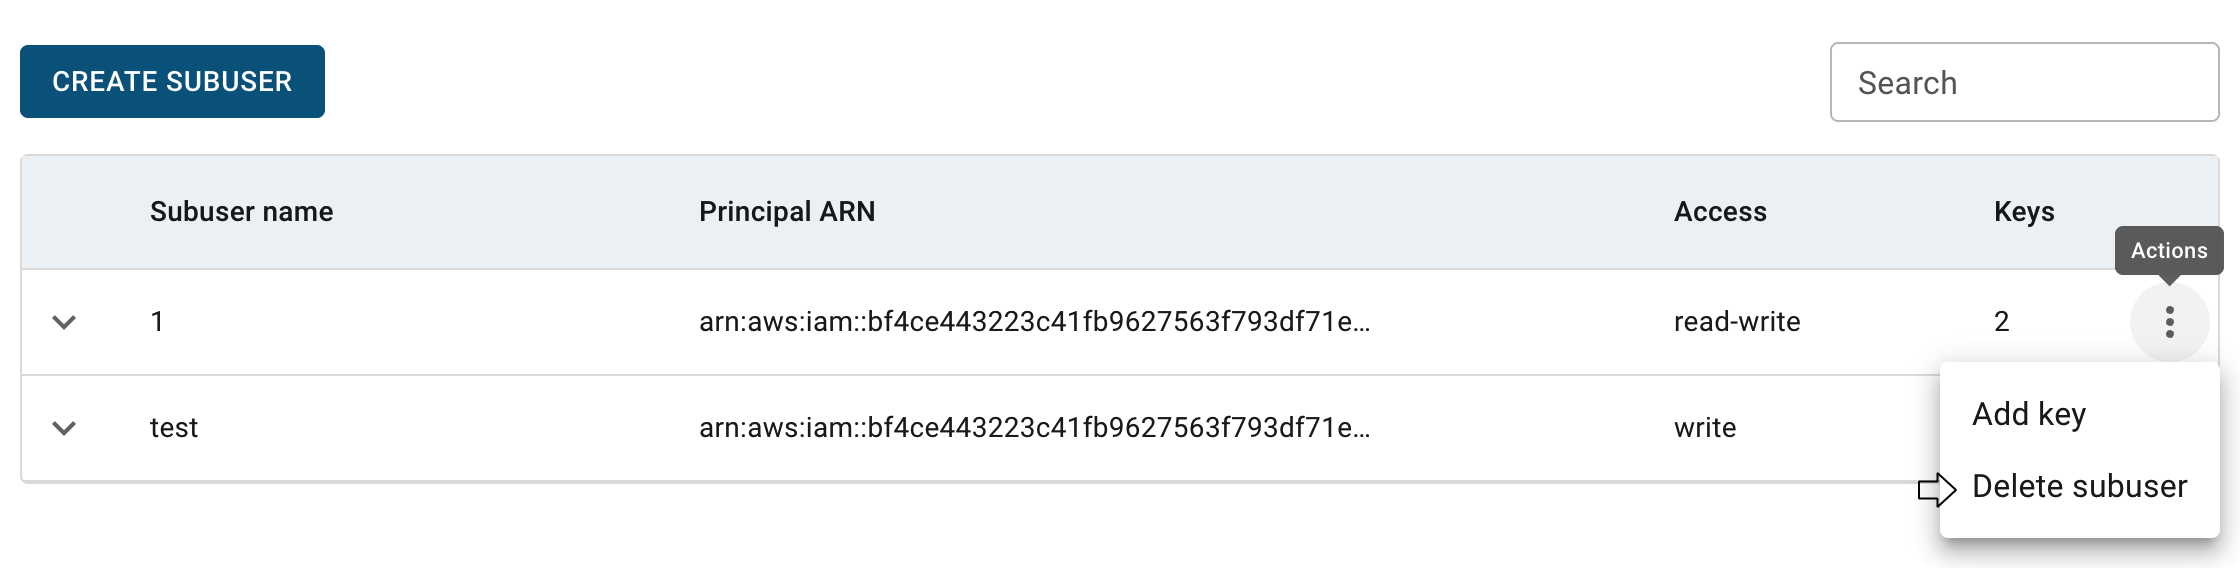
⚠️ Deleting a subuser also deletes all of its keys, so anything using them will immediately lose access.