Object Storage Clients
On this page, you can find an explanation to configure and use Object Storage with python API and with S3 Browser third-party tool - a freeware Windows client.
Table of contents
Introduction
In the Cloud Console, you have the option to use Object Storage as with its integrated S3-Browser, or you can choose to utilize different APIs or third-party tools such as S3 Browser (a freeware Windows client available at https://s3browser.com/) or Cyberduck (a libre server and cloud storage browser available for both Mac and Windows operating systems, accessible at https://cyberduck.io/).
Before you can configure and use Object Storage, you need to create credentials that consist of an access key and secret key and will enable secure access to your Object Storage resources, allowing you to manage and interact with your data.
To find instructions of how to create Object Storage Credentials in the Cloud Console, please, see the article - Object Storage Credentials
Use Object Storage with Python API
Python support is provided through a fork of the boto3 library with features to make the most of the Cloud Console Object Storage. To start use the Object Storage with the Python API, do the following:
- install boto library by running the command:
apt install python3-pippip install boto
As well as Python API you can select other programming languages for using the Object Storage.
Now let’s take a closer look at each block of code to deal with possible interactions with Object Storage via the Python API:
Create connection
To create a connection for interacting with the server, use next block of code:
import boto
import boto.s3.connection
s3_access_key = 'your_access_key'
s3_secret_key = 'your_secret_key'
s3_host = 'upper-austria.ventuscloud.eu'
conn = boto.connect_s3(
    aws_access_key_id=s3_access_key,
    aws_secret_access_key=s3_secret_key,
    host=s3_host,
    port=8080,
    calling_format=boto.s3.connection.OrdinaryCallingFormat(),
)
Remember to replace the your_access_key and your_secret_key part with your credential information, and, also, check if the s3_host is correct - if it matches the correct Region.
Create bucket
To create a new Bucket, use the next block of code:
bucket = conn.create_bucket('1-bucket-using-python')
print(f"New bucket created:\n{bucket_name}\t{bucket}")
The 1-bucket-using-python is the name of the new bucket, please enter the desired name for your bucket here.
List buckets
To get a list of Buckets, that you own, use the next block of code:
for bucket in conn.get_all_buckets():
    print ("{name}\t{created}".format(
            name = bucket.name,
            created = bucket.creation\_date,
    ))
It, also, prints out the bucket name and creation date of each bucket.
Create object
To create a new object in the bucket, use the next block of code:
key = bucket.new_key('hello.txt')
key.set_contents_from_string('Hello World!')

key = bucket.new_key('private_info.txt')
key.set_contents_from_filename('/home/usr/private_data.txt')
So, it creates a file ‘hello.txt’ with the string “Hello World!” and a file ‘private_info.txt’ with the data from the local file.
List bucket content
To list a bucket’s content, use the next block of code:
for key in bucket.list():
    print "{name}\t{size}\t{modified}".format(
            name = key.name,
            size = key.size,
            modified = key.last_modified,
            )
It, also, prints out the object name, size and creation date of each object.
Change object ACL
ACL = access control lists
To make objects to be publicly readable or to be private, use the next block of code:
hello_key = bucket.get_key('hello.txt')
hello_key.set_canned_acl('public-read')

private_key = bucket.get_key('private_info.txt')
private_key.set_canned_acl('private')
So, this code makes the object ‘hello.txt’ to be publicly readable, and the object ‘private_info.txt’ to be private.
Generate object download URL
For publicly readable objects we can generate an unsigned download URL.
Use the following block of code to implement this:
private_key = bucket.get_key('hello.txt')
hello_url = hello_key.generate_url(0, query_auth=False, force_http=False)
print (hello_url)
For private objects we can generate a time-limited, signed download URL, that will be operational for a specific duration, after which it will become invalid.
Use the following block of code to implement this:
private_key = bucket.get_key('private_data.txt')
private_url = private_key.generate_url(3600, query_auth=True, force_http=False)
print (private_url)
Please, notice here, when a client application accesses buckets, it always operates with the credentials of a particular user. As every user belongs to a particular project, therefore, for using this links you should add your project ID before your bucket name, and the working links in both examples will look like this:
for publicly readable objects - “https://upper-austria.ventuscloud.eu:8080/Your_Project_ID:new-bucket-using-python/hello.txt";
for private objects - “https://upper-austria.ventuscloud.eu:8080/Your_Project_ID:new-bucket-using-python/private_info.txt?Signature=XXX&Expires=1316027075&AWSAccessKeyId=XXX"
Find your Project ID you can:
on the Overview page in the Cloud Console:

in the link, when you use Cloud Console;
Delete object
To delete an object from the bucket, use the next code block:
bucket.delete_key('hello.txt')
It deletes a file “hello.txt” from the bucket.
Deleting bucket
To delete a whole bucket use the next code block:
conn.delete_bucket("1-bucket-using-python")
It deletes the whole bucket called “1-bucket-using-python”.
Use Object Storage with third-party tools
Another way to utilize the Cloud Console Object Storage and manage data stored in it is by using third-party tools.
Some of these tools include:
S3 Browser - a freeware Windows client that provides a user-friendly interface for interacting with the Cloud Console Object Storage. You can find more information about it at https://s3browser.com/.
Cyberduck - a libre server and cloud storage browser available for both Mac and Windows operating systems. It offers seamless integration with the Cloud Console Object Storage and can be accessed at https://cyberduck.io/.
In this section, we will explore how to use the Windows client S3 Browser to interact with the Cloud Console Object Storage and manage your data effectively.
To download and install it on your computer, go to the next page https://s3browser.com/.
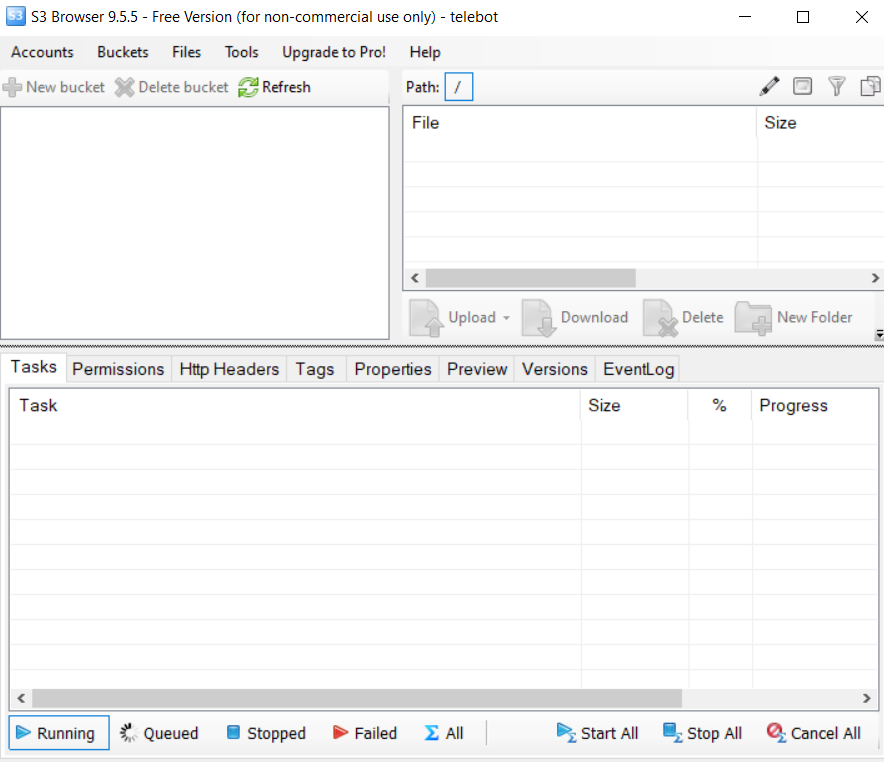
After installation, you can open on your computer S3 Browser and see the next interface of this program:

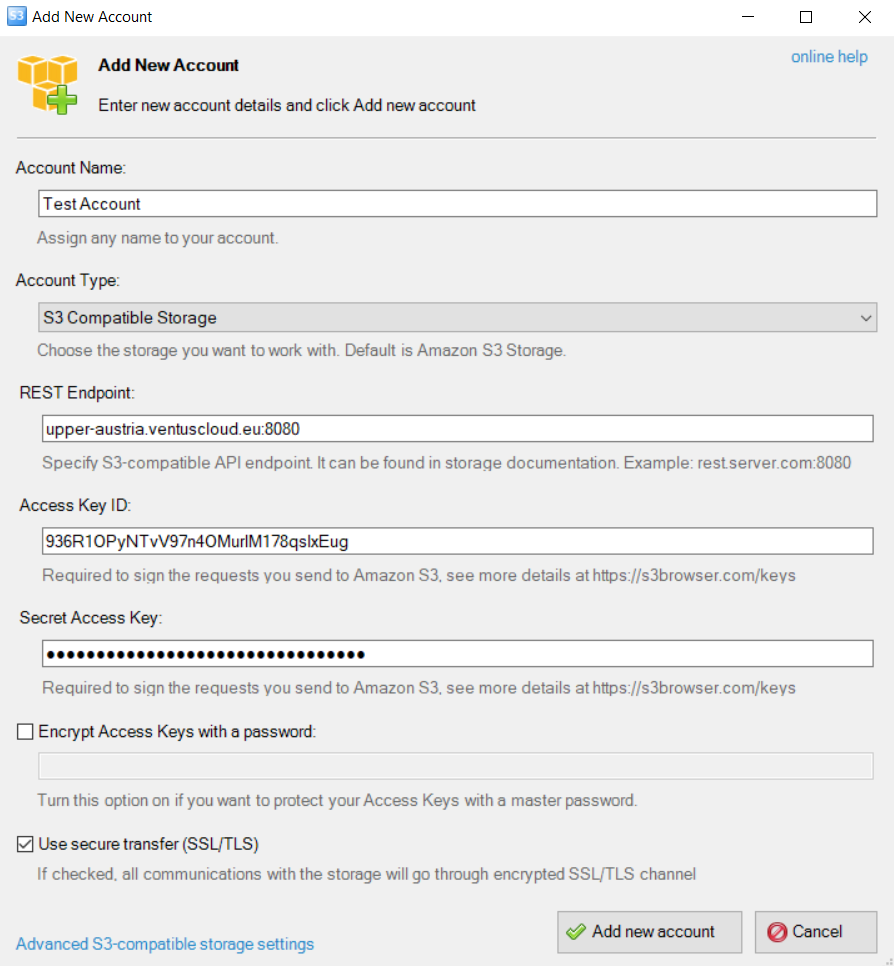
To start work with the Cloud Console Object Storage, provide your credential information, for this do the following:
- on the main Navigation Panel go to Accounts, choose Add new account:


- fill in fields on the following page as shown below press Add new account:

After these steps, a connection to the Cloud Console Object Storage through the S3 browser is established and you can see all owned buckets and to manage them:
- To add a new bucket or delete a bucket just by clicking on the one of the buttons:

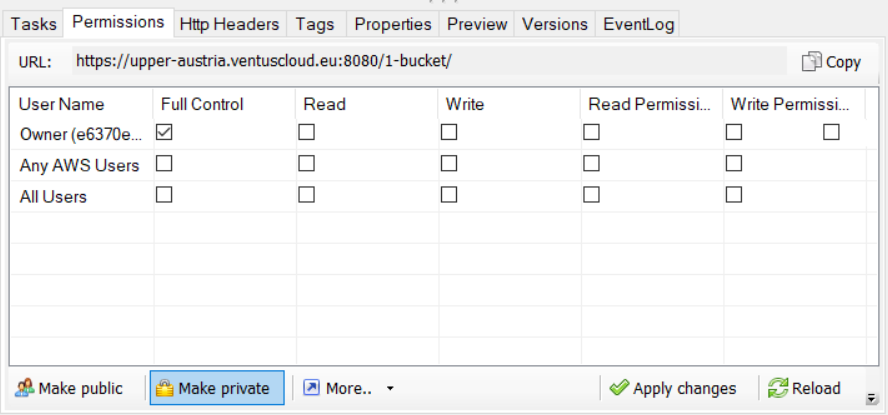
- To make bucket public or private go to Permissions tab and select the necessary option:

So, as you can see, using the Cloud Console Object Storage through the S3 Browser is as easy as using programming languages.